✕
What issue are you experiencing?
Cracks, water intrusion, crawl space moisture, settlement, etc.
Cracks, water intrusion, crawl space moisture, settlement, etc.
Crawl spaces are highly vulnerable to moisture, which can create problems like mold, wood rot, and poor air quality inside the home. A vapor barrier acts as a protective layer, helping to block ground moisture and keep the space dry.
At first glance, a vapor barrier may seem trivial. You don’t spend any significant time in your crawl space, so you don’t care if it’s damp or smelly. There’s a layer of flooring and insulation between you and the crawl space- isn’t that enough?
Unfortunately, the answer to that is a very big, very loud, shout-it-through-a-megaphone NO. A vapor barrier, also known as a moisture barrier, is actually the bare minimum protection you should have in your crawl space.
Acculevel has been repairing foundations and waterproofing crawl spaces since 1996. The fact that we’re pushing you to have a vapor barrier probably seems highly convenient, if not actually suspicious. But in reality? We are trying to help you avoid expensive repairs to your home. Without proper care and maintenance (like a vapor barrier), your foundation can sustain significant damage. Not convinced? That’s okay- just keep reading.
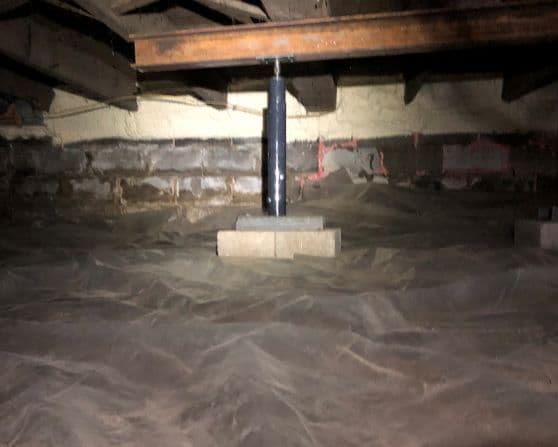
A vapor barrier is a plastic liner that covers the dirt “floor” of your crawl space. Its purpose is to block vapors and moisture in the soil from getting into your crawl space.
This is important for two reasons:
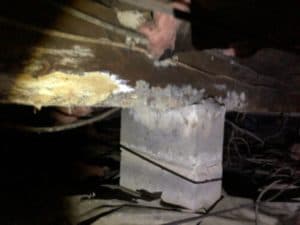
This photo was taken by an Acculevel project advisor during a routine estimate. The vapor barrier has decayed, allowing moisture to feed mold and contribute to decay in the main beam.
If you have questions about waterproofing, sagging floor issues, or unpleasant odors in your crawl space, consult our comprehensive Crawl Space Repair Guide for Homeowners!
Provided you’re not claustrophobic, installing a vapor barrier is a project most homeowners can DIY. You will need to calculate the square footage of your crawl space, so you can buy the appropriate amount of liner. You can find a wide range of options at home improvement stores, varying in color, material, and thickness. We recommend using a material with a 6 millimeter thickness; it will last longer than thinner liners.
The crawl space “floor” should be free of debris before you begin; any trash or failing insulation should be removed. Once you have a cleared work space, you will need to unroll the plastic sheeting and lay it out evenly across the “floor.” The barrier should be thick enough that it doesn’t try to roll up on itself, but you may want to set a rock on it in the corners to secure it.
I do want to caution you that this is not a one-and-done type of project. The average vapor barrier only lasts 5-10 years before it begins to break down and deteriorate. If you are not inclined to crawl around under your home, you can readily hire a contractor instead. Acculevel uses a 6 millimeter thick plastic and the cost is approximately $2-$4 per square foot (depending on the amount of debris removal).
Hopefully, when you install (or replace) the vapor barrier in your crawl space you’ll notice a significant improvement in air quality. The air in your home should become less humid, odors should dissipate, and your HVAC bill may even lower.
But if this doesn’t happen, or if you find signs of a developing problem, you will probably have more questions. Here are the most likely issues and additional resources:
If you happen to be one of the 16 million Americans who struggle with claustrophobia, you may not want to install your own vapor barrier. In that case, you will want to find an experienced local company, and request a quote. Most contractors and waterproofing companies provide free estimates; make sure they provide the quote in writing, and clarify how long the pricing is valid.
Not sure about hiring a contractor? In this blog, we’ve detailed the questions you should ask a contractor and provided our answers. We also include a free downloadable form that you can use with other contractors, to verify that you are making the best choice for you and your home.
Before you sign a contract for any service, you should always verify the company is reputable, insured, and accredited by the Better Business Bureau.
If you’re experiencing moisture issues, foundation damage, or sagging floors, crawl space repair in St. Louis, MO may be the solution to protect your home. The region’s fluctuating weather conditions make it crucial to address crawl space problems early to prevent costly structural damage and poor indoor air quality.
If you live in St. Louis, Missouri, or the surrounding areas, contact Acculevel. We specialize in waterproofing, foundation repair, and crawl space repair, providing free written estimates with quotes valid for up to a year. We also offer some of the best warranties in the industry, ensuring long-term protection for your home.
Our team will schedule an appointment with an experienced project advisor, who will evaluate your home and recommend the best course of action to keep your foundation strong and your living space healthy for years to come.
[DISPLAY_ULTIMATE_SOCIAL_ICONS]