
✕
What issue are you experiencing?
Cracks, water intrusion, crawl space moisture, settlement, etc.
Cracks, water intrusion, crawl space moisture, settlement, etc.
Originally published 8/4/21; updated 12/15/22
What causes problems with foundations? Your home was built to code, has been solid and healthy for many years, and now suddenly you have a crack between the blocks. You don’t live in an area with earthquakes, so what’s the deal?
The reality is that small changes in the ground around your foundation can have a very big impact on your house. Your foundation is a bit like Goldilocks. If the ground around your house is too dry or too wet, that’s not good. It needs to be “just right.” And sadly for homeowners, you have very little (if any!) control over the conditions that come into play.
Acculevel has been repairing foundations for more than twenty years. Founded in 1996, this family-owned and operated company has restored stability to thousands of homes. We strongly believe that everyone deserves a safe and healthy home. For us, this includes providing clear and honest information about our repair industry so you can make the best decisions for you and your home.
There are many factors that contribute to a foundation developing a problem. It can be difficult to correctly diagnose an issue and perform the appropriate repairs. In this comprehensive guide, we’re going to provide the exhaustive list of the symptoms to watch for, detail the issues that arise, and explore the best solutions for each. We are going to answer the most commonly asked questions we receive, and hope to address all of your concerns.
I have written this as a sort of mini-course, like a Foundation 101 for Homeowners. In the first three chapters, we examine the causes of foundation problems. After that, we discuss the warning signs that occur when your home is developing issues. We then move from diagnosis to treatment, including what repair methods may be needed and their associated costs. Of course pricing varies from one contractor to another, but we include our costs to help you gauge the veracity of the quotes you may receive. Finally, In an effort to be fully transparent, we include a disclosure of the potential challenges that come with each repair type.
If you have time, I hope you will read through this entire guide. But if you have come to this page because you have found cracks or water in your foundation and want to skip ahead, the chapter titles function as links directly to that section.
Let’s begin with spring rains. April showers may bring May flowers, but they can also create flooding issues.
The ground around your home can absorb a certain amount of water, but things get ugly when that limit is exceeded. As soil becomes saturated, it expands and becomes heavy with water. Soil expansion or heaviness applies pressure against anything -like your house- that is in its way. When this happens, your basement wall is functioning similar to a dam, trying to hold back water and soil.
The formal term for this is hydrostatic pressure. We explore this topic in detail in one of our blogs, because this pressure is a major player in both waterproofing and foundation issues.
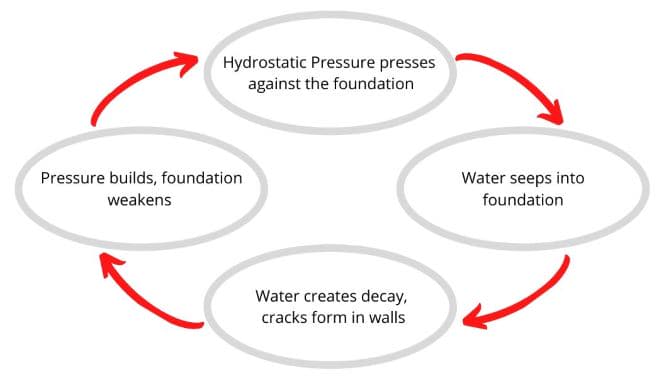
When water pushes against your foundation, it’s applying pressure. As long as your foundation is secure, your home is stable. But over time, that pressure can become too much, and your foundation will weaken.
Foundations are commonly made of concrete or concrete blocks, which are very strong substances, but they are also porous. This means that water can get into- and through- your foundation into your home. In order to get into your home, water first has to saturate the foundation.
High humidity levels and water leaks indicate that hydrostatic pressure is becoming a problem. You may need waterproofing or encapsulation to address water infiltration.
In this guide, our focus is on the issues that go beyond water damage: the erosion it causes, the cracks it creates, and the resulting instability of your foundation.
Too much water around your foundation can wash out, or erode, the soil beneath your foundation’s footings. Footings are the concrete poured first during construction; your foundation walls are built on top of them. Water can also soften the soil until the ground no longer evenly supports the weight of your home.
It’s a bit like dominoes: once the footing starts to sink, the wall built on it lowers, and this shift applies stress to the overall structure and creates a settling problem.
This settling is a problem because it exerts pressure on your foundation and causes it to crack. Cracks add to the structural instability; cracks cause the foundation to work as multiple separate pieces (instead of one functional unit). This can create problems throughout your entire house.
The Definition of Water Table: this refers to the depth of the ground at which the soil is saturated with water. This usually fluctuates with the seasons; summer drought lowers the level, spring rains increase it.
You can’t do anything about how much it rains, or the level of your local water table. But you can take steps to avoid becoming an unwilling contributor to the problem. The following tips will help you prevent or eliminate water collecting around your foundation:
Tree roots may be taking all of the moisture out of the ground, which creates a different set of problems. (More on that in the next chapter.)
It is also possible that tree roots are digging into or growing against your foundation and applying pressure. This invasive issue can create a different type of foundation damage (as opposed to the type caused by hydrostatic pressure). This is why we recommend that you have any cracks in your foundation evaluated by a professional. A good contractor can try to help you determine the source of the cracks.
If a tree is causing foundation cracks, you will need to consult with an arborist or landscaper about how to resolve this without killing your tree. Or at worst, hire a tree service if removal is absolutely necessary. If you are considering planting trees on your property, please discuss location and growing habits with a knowledgeable gardener or nursery. As my grandmother likes to say, “a little planning can prevent a lot of trouble.”
In the introduction, I mentioned that foundations were like Goldilocks. You probably thought I was weird for saying this (and yeah, you may be right), but it IS an accurate statement. Because now that we’ve reviewed how too much water can damage a foundation? We’re going to talk about how too little is ALSO a problem.
Drought functions like the opposite of hydrostatic pressure. Instead of too much water pushing against the foundation, the absence of water pulls the soil away from it.
I’d like to clarify what I mean by “drought.” It doesn’t have to be the once in a generation, dustbowl-level drought to cause problems. I’m writing this from Indiana, where we regularly experience what some Hoosiers call dry spells: three or more weeks with little to no rain, with high temperatures in the 90s. This can be enough drought to harm a foundation.
In the Midwest, you normally have one of two soil types: granular soil or clay-dominant soil.
Granular soil: has more sand or gravel in it, which allows it to stack together like rocks. It doesn’t “pack together” when wet, like a snowball does, and it crumbles easily when it’s dry. These traits mean water moves through it relatively easily, so it’s less likely to be impacted by drought. Generally speaking, if you have granular soil, your biggest problem will be erosion, not drought.
Clay-dominant soil is more susceptible to drought. Clay-dominant soil can be molded when wet, and on dry summer days will crack like pie crust that’s been baked too long. Clay particles function like sheets of paper, stacked tightly together. Water slowly seeps through it; the particles have to separate in order for the water to pass. This is a much slower process, which means water collects and dissipates very gradually. Soils with clay are much more likely to expand during a wet season, which is how hydrostatic pressure develops.
For clay soils, drought is an equally serious concern. As all the water drains out of the soil, the particles get closer together, shrinking the ground. During a dry season, the soil can shrink or pull away from your foundation, which leads to settling. Tree roots can compound this issue, as they will pull moisture away from the house to support themselves.
The best thing you can do for your foundation under these circumstances is to water it. But this can be a difficult task. You need to water around the foundation enough to keep the clay from shrinking, but not so much that it builds hydrostatic pressure. This is best accomplished by placing soaker hoses around the foundation, and running them for 30-60 minutes a day during the cooler evening hours. If you water during the heat of full sun, the water will evaporate more rapidly and accomplish less.
You also need to be aware of any water restrictions imposed in your community. Often, if the drought is bad enough to warrant this method of treatment, you have to make sure you’re not violating local codes.
Speaking of codes, our next topic is on good building practices- for both the original structure and for any later additions made to your home.
While it is a less common issue than hydrostatic pressure, poor construction can also have a negative effect on your foundation. The most likely culprits are inadequate preparation before the build or improperly built additions.
In order to understand the relevance of compaction, we need to briefly review how to prepare a property for house-building. To begin, a construction team digs a hole for the foundation. They dig it somewhat larger than the home will be, to give themselves room to work.
After the hole is dug, it’s necessary to remove or compact the disturbed soil. Softer soils should also be removed and replaced with more suitable material before compaction. Before I worked for Acculevel, I thought soil compaction was a fancy way of making the ground level- because I thought that’s all the builder needed to do. But a home needs more than just a level base; it needs a solid, dense base.
If a builder does not produce this solid, densely packed base before building, the ground may settle significantly under the weight of the home.
The Definition of Soil Compaction: the process of tamping (flattening) soil until it reaches the desired density. Well-compacted soil resists moisture intrusion and settling pressures.
The soil can be tested before and during the compaction process. A qualified testing company can tell the builder what density is needed. Testing during compaction allows the builder to monitor progress, and recognize when the compaction is complete.
The type of soil can vary from one building site to another, and it determines both density and what type of compaction machine is used. If you are building a new home, you should work with a builder who has, or collaborates with, an experienced excavating team. An excavating contractor knows what to look for in soils and composition, and can tell you when you need to consult with a testing company. Generally speaking, you don’t always need a testing company, but you should definitely look for an experienced excavating contractor who can advise you.
FYI: Some builders choose to remove all loose or disturbed soil, which allows them to build on a surface that is “undisturbed.” Undisturbed soil has been left as-is since the ground itself formed, and is considered an ideal surface for building. But getting it just right (there’s that Goldilocks reference again!) is not easily accomplished.
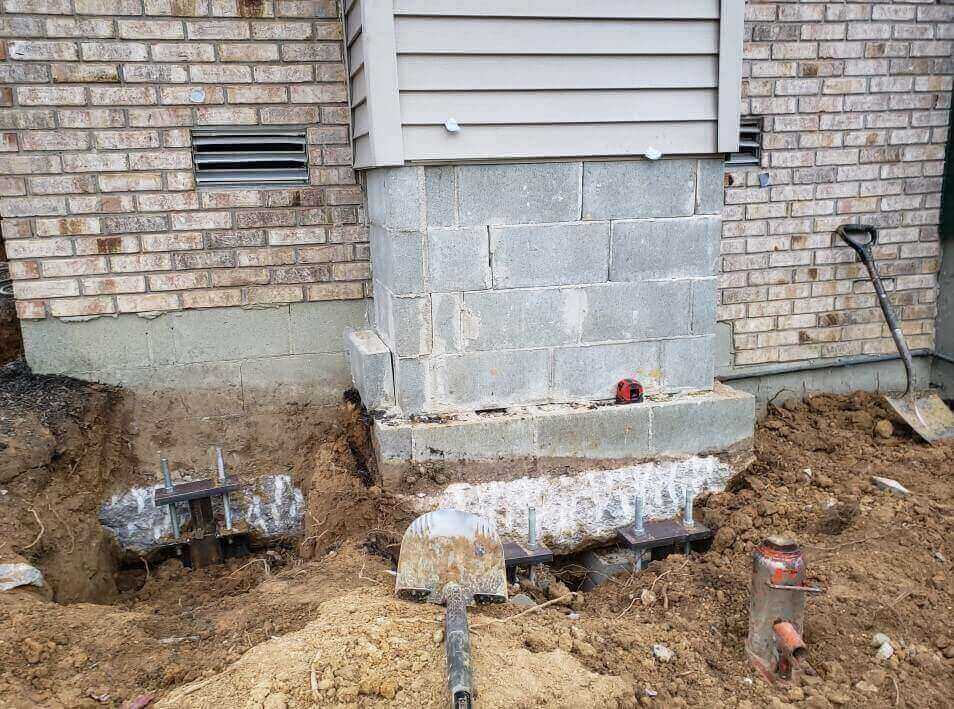 This photo was taken by an Acculevel crew member during pier installation. In this instance, both the house and the chimney needed reinforcement.
Another item you should consider: is your entire home one original structure? Did the previous owner build an addition? Did they file the necessary permits and take the appropriate steps?
After all, you don’t want to build a second story on a home, and discover afterwards that your foundation isn’t capable of supporting it. If they added a section to one side of the existing home, it’s important to know if the original foundation was disturbed during the construction.
If your home has a basement and a crawl space, or a garage next to the basement, this may indicate a possible addition. The primary concern is: what is under those additions? Were they built on top of the backfill material, or on well-compacted soil? Is the garage on a shallower foundation (compared to the home)?
The Definition of Backfill: soil that is put back or “filled in” around the foundation after construction is complete. In an ideal situation, this soil would also have been compacted. But it’s often not done as tightly, and can be compromised by later landscaping work.
In either case- shallow foundation or looser soil- the addition will probably settle at a different rate than the home it’s attached to. This can create stress in your foundation where the two foundation depths are connected, and can damage the foundation walls or floor.
Any issues or irregularities in the building addition- or signs of shallow foundations- should have been notated by the home inspector before you bought the property, but human error is possible.
If you call your local city or county government, they should have records of the building process. If records are lacking, or there is reason for concern, you should have a structural engineer review your property. They will be able to determine if the structure is properly built for its weight load, and recommend any needed changes or repairs.
A structural engineer is trained very specifically to evaluate the structural integrity and stability of a building. This is different from the education most foundation repair contractors and home inspectors have. An engineer usually charges an hourly rate, and it won’t be cheap. But if there is a structural component being questioned, there is no substitute for their expertise. Your safety- and protecting the value of your home- is worth the expense.
Now that we’ve talked about the potential causes of foundation issues, let’s start evaluating some specific concerns. The next chapter discusses the different types of cracks that can occur in a foundation, and how to tell which cracks you have.
Before we begin, I want to point out that not all cracks are a sign of foundation problems. An occasional hairline crack is common and not an immediate cause for concern. Here in the Midwest, temperatures can vary well over 100 degrees in a year. At the height of summer, it can be 90+ degrees, and below 0 on the coldest day of winter. These temperature changes cause the ground to contract and expand, which can cause slight hairline cracks.
Temperature changes can also cause your foundation and building materials to contract and expand because water is an ingredient in concrete, mortar, and even drywall “mud.” Minor cracks sometimes occur when these building materials dry and set up; these are often referred to as “shrinkage cracks.”
A hairline crack will be super thin and consistent in width. Not sure how thin a hairline is? Try the penny test. Hold a penny between your finger and thumb, and press the edge of the coin against the crack. If the crack is thinner than the penny, you have a hairline crack.
Does a hairline crack need to be repaired? Yes, it should be filled while it is a minor issue. You want to have all cracks filled to prevent them from worsening.
Now, if that hairline crack is letting in water, the repair should be done as soon as possible. It doesn’t matter if it’s just a few drops of water, or a slow trickle- it will not get better, only worse. Once a crack is letting in water, it’s an indication that hydrostatic pressure is forming in that area. This almost guarantees the crack will widen, and the situation will worsen quickly. (Not to mention the issues caused by water damage!)
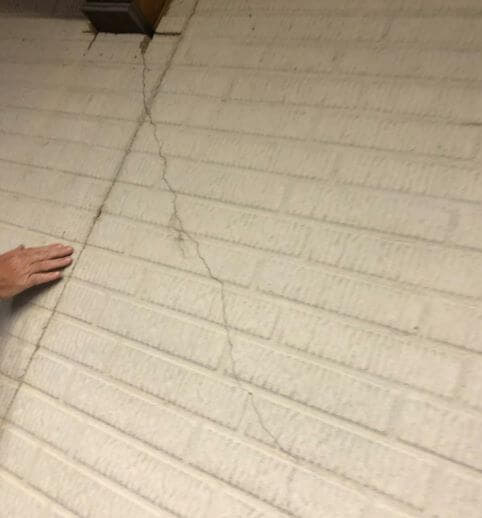 This picture was taken by an Acculevel project advisor on a routine estimate appointment. This hairline crack has widened at the top and is allowing water in.
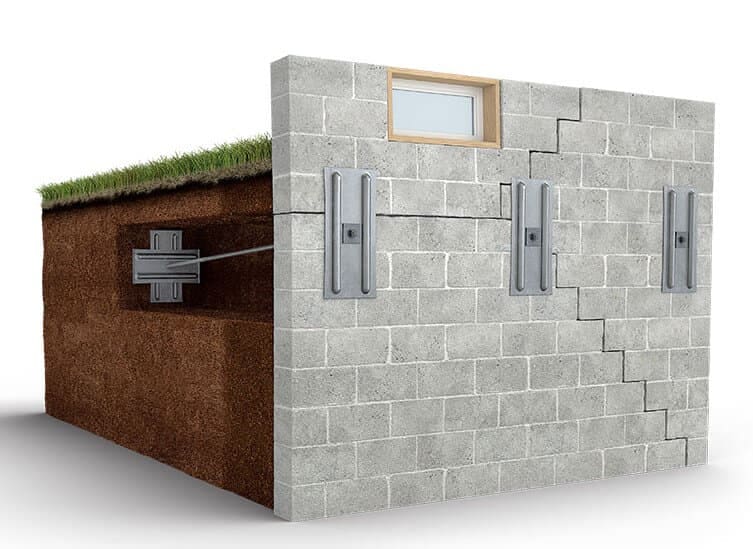
V shaped cracks are like hairline cracks gone bad. Most of the crack is thin and consistent in width. But at the top or the bottom, the crack widens or flares out, so that it looks like a filled in letter V.
These cracks indicate that your foundation is moving. Specifically, this usually indicates that a corner or end of the foundation is sinking, and the stress of it pulling at the wall causes the crack to form. If a portion of your foundation is sinking (also called settling) you are going to need piers to repair it.
This is where you should freak out a little. (But not too much! Anxiety is bad for your health.) If you have a poured concrete wall with a long horizontal crack in it, this is a very bad sign.
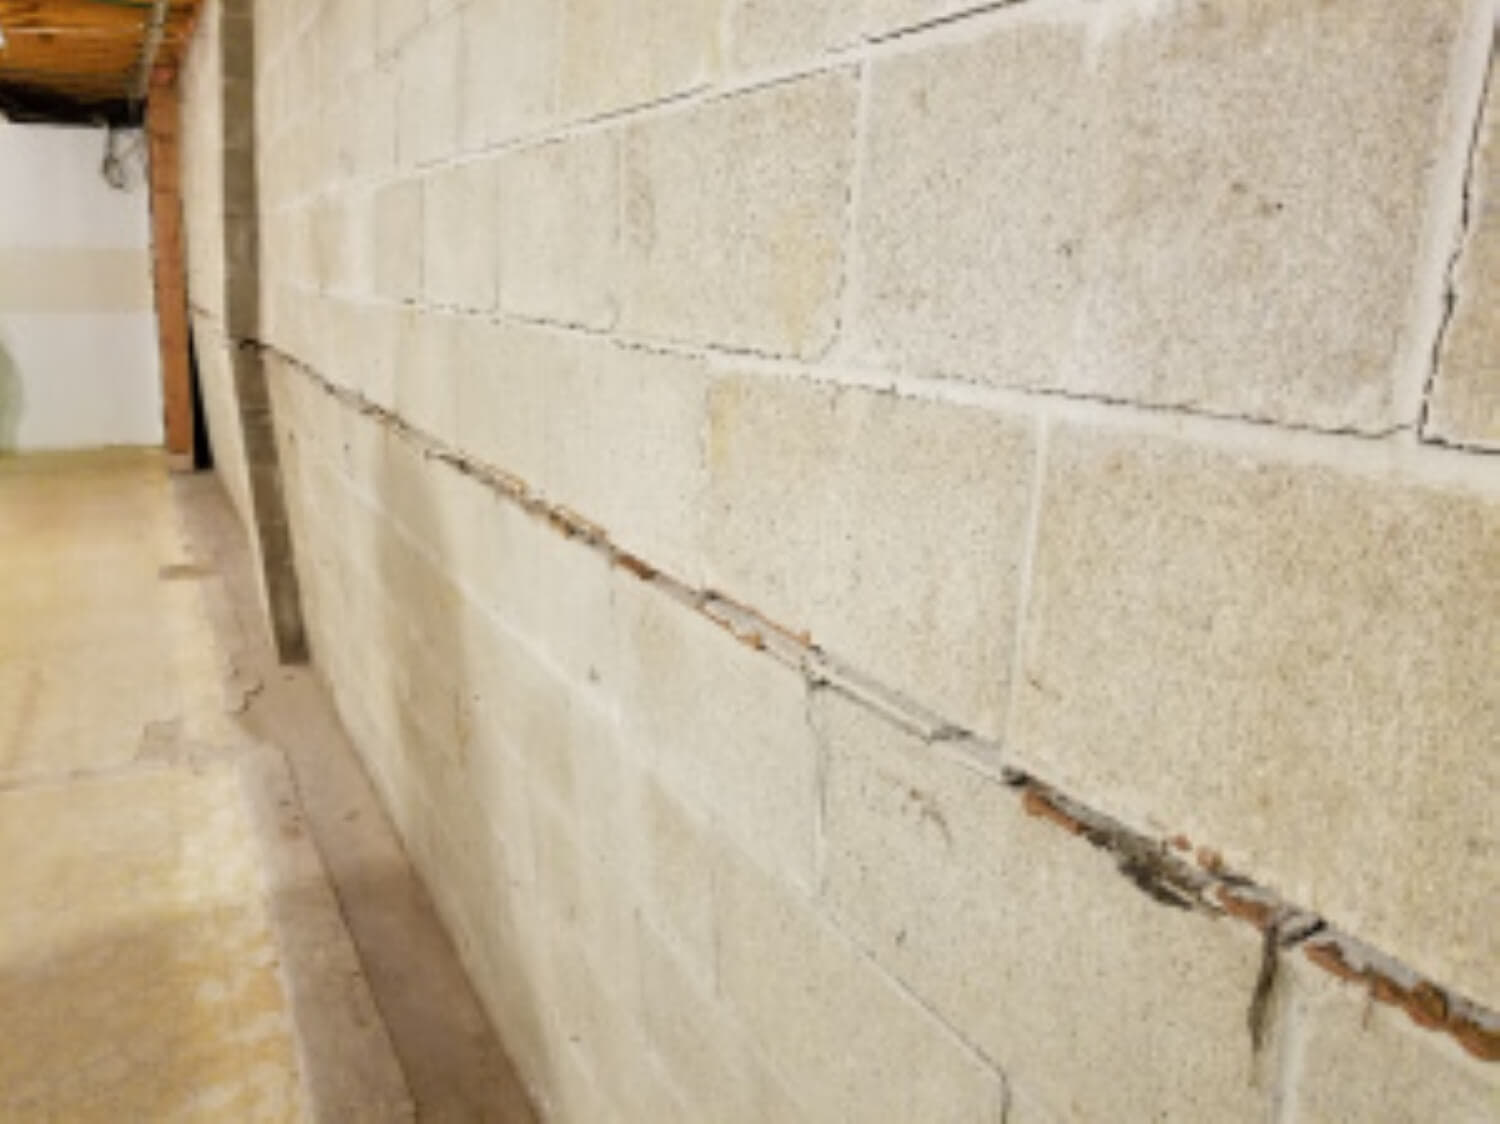
If your foundation is made of concrete blocks, you may have either a long horizontal crack or stair-step cracks. It’s possible you may have both, like the homeowner below.
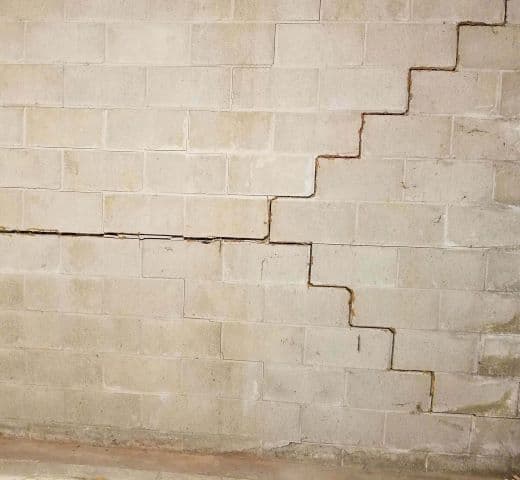 This picture was taken by an Acculevel project advisor during a routine free estimate.
These types of cracks are signs that hydrostatic pressure is winning a prizefight with your foundation wall. Once these cracks form, you need to have that wall stabilized and reinforced. Left untreated, the wall will begin to shift and bow. In the photo below, you can see a crack has widened into a gap, and the wall is bowing inward at the center.
 This picture was taken by an Acculevel project advisor during a routine free estimate.
If this wall had been left alone, untreated, this gap would have continued to grow. The bowing would have become more extreme, allowing water and dirt to enter the basement. Eventually, this wall would have collapsed.
This should go without saying, but a collapsing basement wall is a massive problem. It compromises the safety and stability of your home. The entire structure will be at risk: flooring gives way, dividing walls crack and move, windows and doors won’t open or close… it’s entirely possible you may not be able to live in your home until it is repaired.
This is one issue I can be accused of “nagging” readers about; one of my first posts for Acculevel was it is urgent that you fix a bowed or bulging basement wall, and here’s why. I feel very strongly about this particular issue, and with good reason. The costs to remedy this type of situation once the wall collapses are infinitely more expensive than repairing a bowing wall. This is an instance where a delay could have major consequences. We review these costs in more detail in this article about the costs of delay.
This is where the diagnosis can get complicated. If you see cracks in the drywall of your home, this can mean either a sagging floor or a settling foundation.
Sagging floors are not caused by foundation issues; they originate in the structural wooden flooring system. If your floor is sagging, your floor joists, main beams, band boards, sill plate should all be evaluated for damage. We discuss this topic more thoroughly in the next chapter.
Cracks in the drywall only indicate a settling foundation when you also have additional symptoms. If the foundation is the cause, a room with drywall cracks will likely also have doors or windows that “stick,” meaning that they either don’t open easily or won’t stay closed. You may also see cracks in the foundation, either inside or out. The picture below shows a stair-step crack in the external foundation.
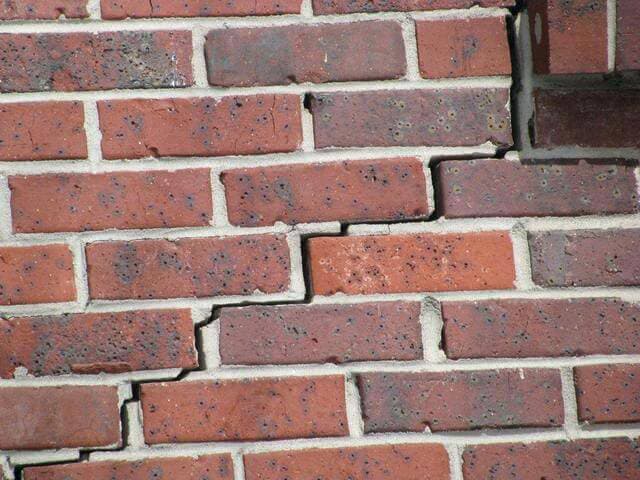 This picture was taken by an Acculevel project advisor during a routine free estimate.
You may be wondering, why is an external stair-step a sign of settling? After all, inside the foundation, stair-step cracks signify a bowing wall. I’m glad you asked, because I had to ask it too! The difference is in the cause of the crack.
Internal horizontal or stair step cracks inside a foundation are caused by hydrostatic pressure. But external cracks in the foundation are typically caused when your footing is settling. External cracks indicate that your foundation is shifting because the ground beneath it has moved.
If you have noticed cracks in your foundation, inside or out, you should have a professional evaluate them for you. Crack Assessment is a learned skill that takes practice, and a misinformed evaluation can lead to repairs that will cost you money without solving the issue. One of the best ways to review a foundation for settling is using a laser level; in this video, our Sales Director demonstrates how this works:
If you have cracks in the drywall of your home, but are lacking the other signs of a settling foundation, you probably have a damaged flooring system and need to pay close attention in the next chapter. If you are confident you have a settling issue, skip on down to Chapter 6 where we start reviewing repair methods.
As I mentioned, sagging floors are not a foundation issue. If the floor in your home is sagging, it’s due to problems with the structural wooden flooring system. We go into details about how to repair these issues in an article that reviews repair types and costs. But for the sake of clarity, I’m going to discuss the symptoms that can be misinterpreted as settling.
If you see cracks form in the drywall of your home, this can be a sign of either a sagging floor structure or a settling foundation. That symptom by itself is not conclusive, and this can be frustrating for a homeowner wanting to know what’s wrong with their home.
A gradually sloping floor is one of those issues that can escape notice. When you are very familiar with something like your house, subtle changes can occur right under your nose (or toes, in this case).
But sometimes it’s obvious. You see a gap between the floor and the baseboard, or the floor has noticeable high and low points. These are symptoms that indicate a floor structure problem.
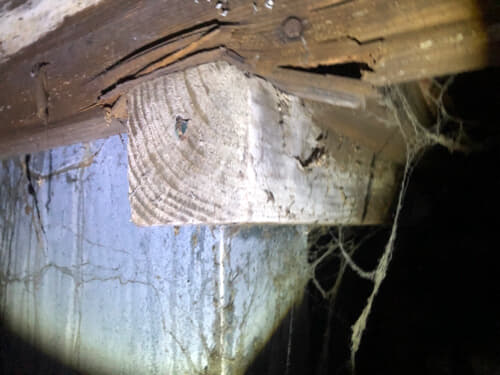 This picture was taken by an Acculevel project advisor during a routine estimate appointment. The floor joist is rotting and crumbling as it rests on the beam.
Maybe yours isn’t too bad or you’re not sure. Either way, you need a better test than just relying on the naked eye. Pick up a marble or a ball (you may need to banish pets or children from the room first!) and choose one end of the room. With a small amount of pressure, roll the object away from you and watch. Ideally, it will roll smoothly and consistently across the floor.
If it rolls up and down like a tiny roller coaster, you probably have some bad floor joists.
Does it gain speed as it goes across? That’s a sloping floor. Sloping could be a damaged sill plate, band board, and/or joists.
If the ball reaches the center of the room, then slows and starts to roll back and forth in a hollowed spot? That’s most likely a sagging center beam.
But- and this is why this is tricky- if the ball doesn’t roll straight across the floor and instead turns and rolls to an outside wall, that could still be a foundation issue.
So if you’re still not sure, or have found signs that indicate you have both types of issues, please take a break from your research here and dive into our DIY foundation checklist. This checklist is based on Acculevel’s own 21 Point Inspection Plan, which costs $500 for 5 years.
But our DIY Home Inspection Foundation Checklist is available to you at no charge, and will walk you through a detailed review of your home’s potential trouble areas and give advice on when you need to take action.
As someone who is not mechanically inclined, I have the utmost respect for craftsmen, contractors, and builders. But even if you are a talented handyman, I have to ask: please do not attempt to repair any foundation cracks yourself.
I understand the desire to do your own repairs and save yourself some money, but your foundation is not the place for DIY experimentation. Not even for skilled workers. There is a substantial difference between repairing a crack in your foundation and caulking the edge of your bathtub. These cracks take different materials and application methods, and the best options are often not widely available to consumers.
Please have an expert review the situation. If they determine it’s not a sign of a larger problem like structural damage, then feel free to ask them to recommend what materials you can use to repair the issue. If you avoid obtaining a professional diagnosis, you may cause more problems for yourself. By trying to diagnose a problem yourself, the actual problems linger, making them worse and more expensive to fix.
Cracks in basement walls should be repaired with an epoxy fill. The epoxy material used by contractors is only semi-rigid, even when fully “cured.” Remember how we talked about hydrostatic pressure, and that it can fluctuate with seasonal rains and temperature changes? The epoxy’s flexibility will allow it to “move” with the wall and still maintain a strong seal.
The costs for this type of repair can vary, depending on how many cracks there are, their length, the amount of material needed, etc. On average, Acculevel customers pay approximately $58 per linear foot for each crack that needs professional repair. If the crack is left unrepaired, it will eventually reach the point where it needs carbon fiber straps. We explain how those work in the next chapter, but for comparison’s sake: a single strap can cost $650-$725.
The repair methods for cracking and/or bowing walls will vary, depending on how severe the issue is. We will review your repair options in order, from methods to fix minor cracks and slight bowing to serious bowing concerns. You’ll learn some basic information about each method, when it’s the best option, and the average costs.
Carbon fiber straps are a product used to reinforce and stabilize a foundation wall. They are the least expensive repair method and the easiest to install. They are effective as long as the wall is bowing two inches or less.
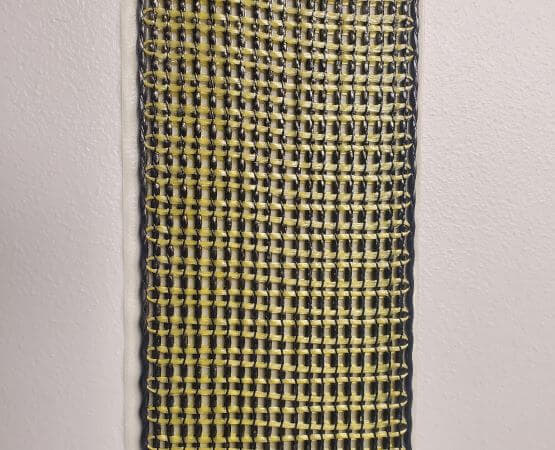 This photo was taken by the author in the Acculevel workshop.
This is a close-up image of the strap that we use here at Acculevel. It’s manufactured by Fortress Stabilization Systems, is the strongest strap available, and is backed by the best warranty in the industry. Acculevel also warranties their installation for the life of your structure.
[box type="info"] Please keep in mind that not all carbon fiber straps are made the same way, nor do all contractors warranty their work as Acculevel does. If you have more questions about warranties in the service industries, we have a blog that reviews the minimum requirements for our industry, and some possible red flags to keep in mind.[/box]
The straps are secured to the wall with a specific type of epoxy. This epoxy seals the wall and fuses the strap to it. The straps have a special anchor at the top and bottom of the wall, to hold it in place and prevent the wall from shifting or sliding.
 This is an illustration of carbon fiber strap installation.
Once the installation is complete, the straps and wall can be painted to minimize the repair’s appearance. A big benefit of carbon fiber straps is that it is possible to install them entirely from the inside of the home, requiring no excavation. This reduces the noise, installation time, and the amount of clean-up that must be done. It also saves you the headache and potential costs of repairing or replacing landscaping damaged by excavation.
Please note: the goal with repairing your wall this way is to stabilize the foundation wall and prevent any further movement. This means that your wall will be firmly held in place, but it may not be fully restored to its original position. If you want a bowing wall restored to its original position, the wall will need to be manually straightened first. Wall straightening does require excavation.
Carbon fiber straps cost approximately $650 to $725 each. A strap should be installed approximately every 4 feet along a bowing wall. If your basement wall is 24 feet long, you will need 5 carbon fiber straps, and that’s an estimated $3,250 - $3,625. The pricing shown includes both materials and labor.
If you have additional questions about carbon fiber straps, we have an article that examines this repair method in detail.
We mentioned that wall straightening requires excavation. If you’d like your bowing wall restored back to its original position, this is the process:
Keep in mind that even after the wall is straightened, it will still need reinforcement. If that wall has weakened once, it’s likely to do so again. The reinforcement prevents that from happening. Think of it like a badly broken bone, that needed pins or a steel rod inserted.
Basement wall straightening costs $300-325 per linear foot. If the wall is 24 feet long, that would be a price range between $7200-7800. This price does not include the carbon fiber straps that you’ll need to reinforce the wall and prevent future movement.
Wall anchors are a good repair method used if the wall is bowing more than 2 inches, but only if you have the necessary space available on your property.
To install a wall anchor, the contractor needs at least 10 feet of usable and accessible ground outside the basement. Anchor installation requires a certain amount of excavation, and how much impact this has will depend on what is outside the damaged wall. You may have expensive or valuable items that need to be removed or relocated to give us access to the needed space, like decking, porches, sidewalks, a garage, etc.
If you do not have at least 10 feet available outside of the problem area, helical tiebacks are the best choice (we cover those next).
 This is an illustration of wall anchors.
Steel plates are installed; one end is buried 10-15 feet away from the house, and the other is attached to the bowing wall.
The two plates are then connected by a steel shaft. This steel rod is gradually tightened, which pulls the plate tightly against the wall. The plate in the yard acts as an anchor, holding the wall in place. Unlike carbon fiber straps, anchors can’t be as easily covered. The only way to conceal anchors or tiebacks is to cover the wall itself.
Wall anchors cost approximately $830 to $1000 each (hand-digging anchors costs more than machine). An anchor should be installed approximately every 5 feet along a bowing wall. If your basement wall is 24 feet long, you will need 4 anchors, which is an estimated $3,320 - 4,000. Again, this pricing includes materials and labor.
The primary goal with anchors (like with carbon fiber straps) is to stabilize your foundation, not to straighten your wall. If you would like the wall straightened, this will require additional excavation and add to the repair costs.
Tiebacks are the most expensive repair method for a bowing wall, but sometimes they are the best fit. It just depends on what is located 10 feet-15 away from the damaged foundation wall. If that is your inground swimming pool, or your neighbor’s septic system, you’re better off paying more for the tiebacks.
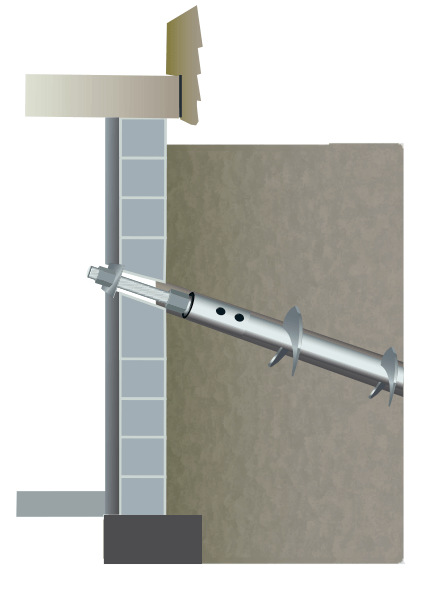 This is an illustration of a helical tieback.
A large steel plate is anchored into the floor of your basement, and it extends up the wall, towards the ceiling. Then a steel shaft with helical (screw-like) plates is attached to the plate.
The contractor then twists the tieback shaft into the earth outside your foundation, until it meets a specific torque. This torque is the force needed to ‘grip’ or hold firm. Generally, tiebacks are 14-21 feet long. In rare cases, a longer tieback is needed for good soil resistance.
You may be thinking that this sounds awfully similar to the installation process for anchors.
Anchors require excavation; the anchor plate has to be installed in the yard several feet down, and 10 -15 feet away from the foundation. Tiebacks do not require excavation- the installation is done from inside the basement. The tieback is drilled deep into the earth, at an angle that allows it to avoid items customarily placed in a residential area.
Helical tiebacks cost approximately $1812 to 1952 each (again, hand labor is more expensive). An anchor should be installed approximately every 5-6 feet along a bowing wall. If your basement wall is 24 feet long, you will need 3 anchors, which is an estimated $5,400 - 5856 (this includes materials and labor).
The methods I’ve covered here- carbon fiber straps, wall anchors, and tiebacks- are truly the best repair options for a badly cracked or bowing wall. But the good news isn’t the only news (pros always have cons, right?). So now that we’ve talked about how to fix the problem, you need to understand the potential drawbacks to these same repair methods.
By now you know that the stability of your home quite literally depends on repairing a badly cracked or bowing wall. But there are some potential issues with the repair solutions, and in the interest of full disclosure, we’re going to go over those now.
For carbon fiber straps, the quality of the wall must be good. If the concrete is soft or deteriorating, the epoxy will not hold. The strap is meant to hold the wall in place. But it can’t hold the wall together if the wall itself is crumbling or deteriorating. If the concrete is in poor condition or the blocks are breaking, you will need to have that section of the wall repaired or replaced.
If you’re not sure, examine the wall and the area around it. Do you see flakes, concrete “crumbs” or small pieces of concrete on the floor? You may want to sweep the area and look at what has collected. Still not sure? Using the point of a screwdriver, try to scrape or pry into the concrete. If you can dig into the wall easily (with effort similar to digging in hard-packed dirt), then your concrete is deteriorating and will need repairs before straps can be installed.
Another potential issue is access. Because carbon fiber straps are attached at the top and bottom of the wall, a contractor needs full access to that wall. This can be inconvenient if your HVAC, water heater, or laundry room are located in that space; these would need to be disconnected and moved during installation.
Likewise, if you have a finished basement, you will need to move any furniture, remove drywall, etc. Restoring your basement to its original glory after repair work is an additional cost that you need to consider when you have the work done.
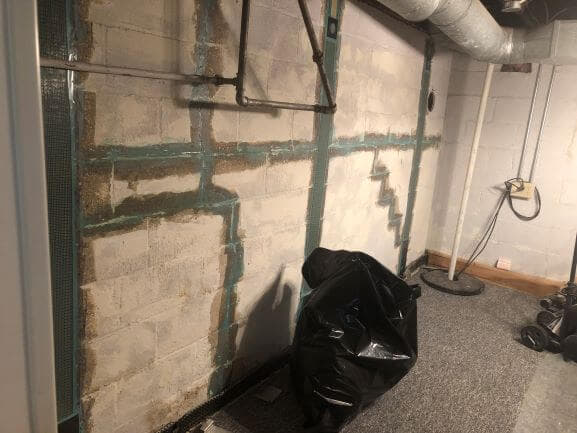 This photo was taken by an Acculevel crew member, after Carbon Fiber Strap Installation and crack repair. Once the epoxy has fully dried, the homeowner can paint over these repairs to match the other white walls.
For wall anchors, you may have to remove or relocate items in your yard. Depending on where the anchor plate needs to be, you may have to remove landscaping, a walkway, decking, etc. This can mean additional expenses, if you have to repair or replace items impacted by the anchor installation.
And for both wall anchors and helical tiebacks, installation requires drilling through the foundation. Any time you put a hole in a basement wall, you risk the possibility of water seepage or leaks. The contractor will fill and seal the edges of the intrusion, but this may need repairs or reinforcement at a later time.
All of these potential issues make repairing your wall seem like a big hassle, and I would understand if you were reluctant to undertake a project on this scale. It can be tempting to, as my boss would say, “kick the can down the road.”
But there is a real, tangible cost associated with delaying those repairs. In this article, we gave four specific examples to quantify what those expenses might be. One of these examples is the topic we just discussed, repairing a bowed wall. Another example covers our next topic: a settling foundation.
Back in Chapter 4, we discussed how multiple cracks or widening cracks can be signs that your foundation is settling. To refresh your memory, I’ll quickly recap the things to look out for:
If you have a settling foundation, helical piers are your best solution. Some contractors use push piers instead of helical piers, but years of experience have taught the Acculevel team that helical piers are a better choice for residential homes, and even most commercial applications. It’s a matter of leverage, and how force is applied. I’ll break down the difference between helical and push piers in the next chapter. First, let’s get the basics of piers sorted out.
A helical pier is a steel shaft with helical (screw-like) plates on the end. This pier is screwed through the ground until it hits stable, undisturbed soil.
 This is an illustration of a helical pier.
This undisturbed soil will be below the frost line, the fluctuating water table, and any disturbed soil. At that level, the ground is solid, so it will keep the pier stabilized and immobile. A pressure gauge system is used to determine the proper depth for the piers. This way, the installation of the piers is specific to the unique soil conditions under your home.
| Fact or Fiction: Is a helical pier the same thing as an auger? Fiction. An auger is a tool that drills into the earth, removing the soil as it goes, specifically to create a hole in the earth. Think of an auger like a large drill bit, and a helical pier like a screw. |
The top of the pier has a steel bracket. This bracket is positioned under your foundation’s footing, the concrete your foundation is built upon. The bracket works like the seat of a chair, to both support the wall and hold it in place. Once the helical pier is firmly placed, the bracket is fitted to the foundation.
 This is an illustration of helical piers.
Want to see this process in action? We have two different videos for you to view.
The first is an installation done at a customer’s home:
The second is a demonstration, performed on a partial wall we built for this purpose. It’s narrated by our Sales Director, Nolan Beery:
The pier is braced in solid earth, which gives it the needed leverage to hold firm against your home’s weight. It is sometimes possible to raise a foundation back towards its original position. If this can be done, that is ideal. But- and I really want to stress this- lift is not the primary goal.
Piers stabilize your foundation, and keep it from moving any more than it already has. Your foundation didn’t settle overnight. It’s most likely that it happened slowly over time. Your house built on that settling foundation has also settled. If you could magically shove the foundation back into its original position, you would do extensive damage to the walls, floors, drywall, windows, etc.
How much lift you can achieve with helical piers depends on how much your house has settled, and how much cosmetic (non-structural) damage you are willing to accept. Let’s say you’ve recently had the windows replaced; if the house is lifted significantly, it may break some of the new windows. Will you be okay with replacing them a second time?
This is something you should discuss with your contractor during the site evaluation. They will need to familiarize themselves with your home and property, before they can discuss realistic recommendations.
It’s critically important to have a contractor who is experienced and well-qualified to do the assessment of your foundation. If not done properly and with the right tools, the installation will be a waste of money and your foundation will not be repaired.
You need to be confident that the contractor:
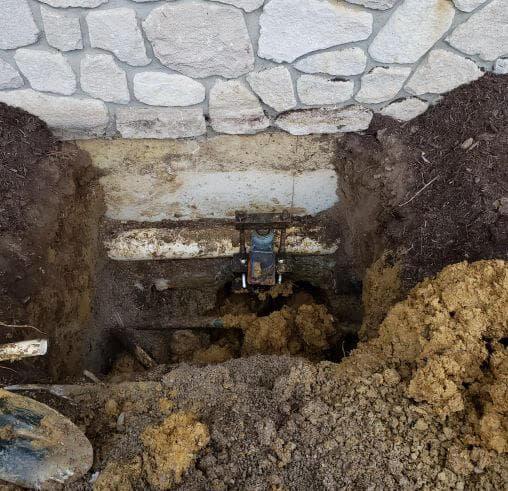 This picture was taken by an Acculevel crew member during helical pier installation.
To an extent, this will depend on how much of your foundation has settled. It’s quite possible you’ll need more than one pier. And you’re safe to assume that additional piers will cost you more money. Helical piers are typically installed outside the wall or corner that has settled. Piers should be placed every 5 - 7 feet, along the affected area on a typical foundation wall.
Another factor that can impact the price is the difficulty of the installation. If the piers are going into a part of your yard that is free of obstructions, they can be dug by machine. This makes for a less expensive, faster, and easier installation.
But let’s say that the piers need to be installed inside a crawl space or basement, or there is a permanent structure like a pool or porch that restricts the workspace. This would require the piers to be installed by hand. This process is obviously slower and more labor-intensive, so it costs more.
While we can provide a price range for you to help you estimate cost, it’s always true that the exact cost will depend on the details specific to your home’s layout and design. All of these numbers include both materials and labor for standard length piers. Piers dug by a machine will cost you around $1750-2200 each. Piers that need to be dug by hand will cost you around $1900-2700 each.
For more information about the pricing, you are welcome to review our comprehensive blog on helical pier cost. We will also review other issues that can have an impact on the costs in Chapter 11.
If you’ve done any research on piers before, you may have come across contractors who install push piers. Push piers are different from helical piers in a few significant ways. We have a longer discussion of the two methods in this blog, if you would like an in depth comparison. But we will discuss the overview of these different methods here.
Both push piers and helical piers are structures made of steel. They are both installed in the ground around a foundation with the purpose to restore a building’s stability and prevent further damage. They are both meant to be permanent solutions, and should be considered a long-term investment in your property.
The big difference between them is how they work.
You may have noticed in the last paragraph that I used “building” and not “home.” Push piers are best used in commercial settings for large and heavy structures. That’s because commercial buildings usually have strong, reinforced foundations that can be pushed against with a lot of force. Push piers use the weight of the building as leverage, which is why they need to be heavy and well-reinforced foundations.
Push piers are heavy tubes that are hydraulically driven through a foundation bracket and into the earth until they reach refusal underneath a home’s foundation. Once all of the piers are installed, a hydraulic jack pump is attached to each of them. Then they raise the house, aiming to reach as close to the original position as possible. Once that is accomplished, the pier columns are secured to brackets. The drawback to this method is that the pushing of the pier against your foundation can put a significant amount of stress- or even cause damage- to your foundation.
| Refusal Versus Resistance: Refusal means a pier cannot be pushed any farther with brute force. Resistance is what we measure for helical piers: it’s how difficult or tight it is to screw into the earth, or how much torque is required to keep twisting the pier into the earth. |
Helical piers can be safely used in both commercial buildings and residential homes. When they are installed, the contractor is using specialized equipment (known as a torque head or drive head) to screw the pier(s) into the ground.
This equipment includes a gauge to measure the amount of force (the torque) needed to screw the pier into the ground. After the necessary soil pressure is met, that is when the pier is attached to your house. At Acculevel, we treat each customer’s home as if it were ours. We are not willing to risk the possible damage that can result from installing push piers.
We firmly believe that helical piers are the best solution, and they are typically the only type we use to repair a settling foundation. Both helical and push piers are effective in large commercial settings; however, we strongly recommend that only helical piers be used in homes and smaller commercial buildings.
But that doesn’t mean helical piers are easy to install, or completely free of any drawbacks.
Any time a contractor has to excavate around your home, there are possible complications. There are three major ones associated with piers, and we’ll review them briefly here. If you’d like more specific information, we have a blog that digs deeply into this concept. And yes, that pun was not intended.
The first and most obvious potential issue is an interruption in utility service. All responsible contractors (and homeowners!) should file requests for utilities to identify their locations before digging in your yard.
In most instances, this is done promptly and thoroughly. However, the people performing this service are human, and can make mistakes. Most commonly, it’s your cable tv or internet access that gets damaged. While we know cable TV and internet outages are interruptions no one likes, we can all agree that more serious complications relate to electricity, water pipes, or gas lines.
The installation process itself is noisy and somewhat messy. This will definitely throw a wrench in your family’s daily routine, but it’s a relatively brief interruption. Depending on how many piers and the digging method (machine or by hand), piers are normally installed within 1-5 days. An Acculevel crew can normally install 3-7 piers per day.
Now, If you work from home or have a home-based business, installation could be more of an issue for you to plan around. I’m thinking specifically of those brave souls who provide child care and need those little darlings to take naps to prevent chaos (and potential mutiny).
Excavation can make a lasting impression on a landscape. Yes, we treat a customer’s home with the utmost care and respect, and we try to minimize what must be removed or relocated. But the fact is: piers require large holes to be dug around your foundation for the installation.
This can mean temporarily relocating plants or decorations. Porches or sidewalks may need to be torn out, and you may even have to remove a deck to provide a work crew with the full access they need.
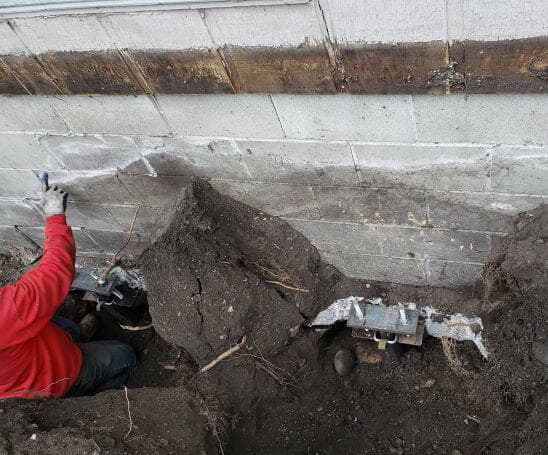 This photo was taken by an Acculevel crew member during pier installation. The dark band across the concrete is where the porch was originally connected to the home.
The standard length of a helical pier is 21 feet. For 90% of Acculevel customers, this is enough. But there is always the small possibility that the standard length pier will not extend deep enough in the soil to reach the necessary torque level.
The most frustrating part of this issue? You can’t always anticipate it being an issue.
We could install piers at 5 houses in the same neighborhood, and one of them could need added depth. It all depends on if you have a soil composition that will hold at 21 feet. Remember when we discussed soil compaction and soil types? This is another area where those things can be problems.
Now, an experienced contractor can make an informed guess. For instance, if the soil is noticeably soft and saturated, or your home is near a lake or river, these are warning signs you might need longer piers. But the only way to know for certain is to install the pier, and read the pressure gauge.
Pricing for longer piers is $25 per additional foot, multiplied by however many piers you need. Trust us, we know it can be immensely frustrating to receive a cost estimate, sign a contract, then have the price increase. But you must understand that if the piers are not installed the full distance to reach load-bearing soil, they will be of no benefit to the home.
You have the right to refuse this additional expense. If you do, a reputable contractor will then refuse to do the installation. To do otherwise is acting on false pretense; it’s worth mentioning again that any piers not installed correctly are wasted effort.
The number one goal of pier installation is to stabilize your home and restore its structural integrity. Like bowing walls, delaying pier installation will result in you paying more. A settling foundation typically will not collapse like a bowing wall; but it will cause greater and worse-looking ‘cosmetic’ damage, the longer it is allowed to continue.
We refer to it as cosmetic damage because it’s not structural damage. But if you’re trying to sell a home with a settling foundation, you’re going to have a hard time with the home inspector. They likely will flag every crack in the drywall, each sticking door or window, the slopes in the floors. Finding a buyer who will look past all of that is going to be tough.
Have you noticed some symptoms that could be foundation issues, but you’re not sure? We have a FREE DIY guide that will walk you through a full foundation inspection. We based this checklist on the 21 point home inspection we offer to our customers (at a cost of $500 for 5 years).
Acculevel provides some of the best warranties in our industry. Before you choose a contractor, make sure you know what guarantee your contractor is offering. I researched the definition of “lifetime” warranties, and you may be surprised by the results. I certainly was, and not in a good way.
If you have not hired a contractor before and would like some guidance on how to proceed, we offer a checklist of questions you should ask. The article provides the questions with Acculevel’s answers, as well as a link to get a FREE blank copy of the questions for your use. It is not limited to foundation repair, either; you can use it with any contractor- roofers, painters, landscapers. The important thing is that you thoroughly vet anyone who is going to work on your home, so you can be confident they are the right fit for you.
I hope we’ve addressed your questions, and provided you with the detailed background you needed. If you have additional questions or concerns specific to your home, your best resource is an experienced contractor who will evaluate your home properly and thoroughly. Foundation issues should not be approached casually; the longevity of your home requires a healthy and secure base.
Please remember- a knowledgeable and experienced contractor is needed for these critical types of repairs. You do not want to invest in major home projects, only to discover the wrong method was used, or that the right method was used incorrectly.
Before signing any contract, we urge you to always verify the company is reputable, insured, and accredited by the Better Business Bureau.
If you live in our service area, please call us. Acculevel is a family-owned company that uses American-made products whenever possible. We offer free estimates to all our customers, and we do not use high pressure or “hard sell” techniques. All of the services we provide are performed by our own employees; we do not use subcontractors on any of our job sites. We look forward to serving you!
Table of Contents