
Crawl Space Repairs: Ultimate Homeowners Guide
But other times- like now- you’re researching something specific, and that brought you to this guide. Maybe you saw one of our posts on social media or watched some of the videos on our YouTube channel. But there are two things all of my readers will have in common: your home has a crawl space, and you have questions about it.
Acculevel is a family-owned and operated company that specializes in foundation repair and waterproofing. Based out of the small midwestern town of Rossville, we serve the state of Indiana and the surrounding areas. Since our start in 1996, we’ve helped over 30,000 homeowners stabilize their foundations, eliminate damp and mold from their crawl spaces, and restored health and strength to previously sagging floors.
Like many other repair companies, we believe homeowners have a right to an honest assessment, transparent pricing, and quality services with long-term warranties. But we also believe a homeowner has the right to fully understand what repairs need to be made, how they need to be done, and why.
This crawl space repair guide is meant to address these questions, as well as many more. As new products and repair methods are developed, we will update our business practices and this guide to reflect them.
How to Use This Guide
You don’t have to read and absorb all of this information in one go. Your crawl space is a permanent part of your home, so you’ll probably have questions again. Bookmark this guide as a resource for future use, then read the first two chapters.
In Chapter 2, we explore the three primary ways that homeowners become aware that there’s something wrong with the crawl space. After you identify the issue you’re experiencing, you can then move to the relevant chapter by clicking the appropriate link. This will help you quickly find the information you’re looking for, without having to browse through material that may not be helpful for you.
If you have more questions after you’ve used this guide, or if you need help with other issues, fill out the contact form. We’ll be right here to help if you need us!
Chapter 1. What is a Crawl Space?
A crawl space is the area below the floor of your home, with unfinished walls and a dirt “floor.” As the name suggests, it’s usually a shallow space that requires people to crawl in and out of it.
A crawl space may not be as useful to a homeowner as a basement is, but it performs an important function in your home’s overall structure. This is how tradesmen like plumbers, electricians, and HVAC experts access the mechanics of your house.
Why Your Crawl Space Height Matters
The ideal height of a crawl space is about 3 feet. The taller it is, the easier it is for repairs to be made. If your crawl space is less than 18 inches high, accessibility becomes a major factor in what types of repairs can be done from below your home.
Adult humans and repair equipment do not shrink to fit! In some unlucky situations, making repairs in an undersized crawl space can require a homeowner to pull up their flooring.
This is true of any professional who may need access to your crawl space: plumbers, electricians, even home inspectors. The American Society of Home inspectors has a detailed standard of practice which states inspectors are not required to enter a space with less than “24 inches of vertical clearance between components and the ground or that have an access opening smaller than 16 inches by 24 inches.”
This regulation mentions the ground, and this is because your crawl space probably has a dirt “floor.” This is cheaper than building a true floor or pouring a concrete slab, but it comes with its own issues. We discuss this more in the next chapter, but I’m sure it’s easy for you to see how a dirt floor is going to be vulnerable to water, burrowing animals, and insects.
If you are not sure if you have a crawl space, or how to access it, we can help! The following video is from our Crawl Space Repair Course.
Chapter 2. When Do You Know Something is Wrong with Your Crawl Space?
Homeowners rarely go exploring in their crawl spaces. These are places that are cramped, dark, dirty, and have spiders, mice, or insects living in them. Even if you’re not one of the many people who are claustrophobic or arachnophobic, no one enjoys crawling around in a dark and dirty place. If you’re not checking it regularly, how do you know when there’s something wrong with it?
There are three common ways a homeowner discovers they have a crawl space problem:
- You notice that your floors are beginning to sag, slope, or have an unusual bounce or “give” to them.
- The crawl space emits a strong musty odor that induces headaches, nausea, or typical allergic reactions like sneezing and watery eyes.
- A tradesperson (plumber, electrician, HVAC contractor) enters your crawl space and they tell you they’ve seen mold, insect activity, or standing water inside.
Regardless of how you learn there’s a problem, the root cause is going to be the same: moisture.
Water intrusion is the arch-nemesis of any foundation, but it is especially troublesome for a crawl space. This is because there is no true floor to impede water’s progress into your crawl space, and the flooring structure is so much closer to any water that gets in.
Water is what feeds the mold, softens the wood for insects like termites, and causes the wood in your flooring to rot. This is the reason why most repairs for floor repair, mold treatment, and pest control all start with waterproofing the space.
If you don’t manage the water getting in? It will create problem after problem after problem for you.
Which of these issues concerns you the most?
Chapter 3. Sagging Floors Indicate A Crawl Space Problem
We sometimes encounter sagging floors in a home with a basement, but it’s rare. It’s just a matter of opportunity; basements have a concrete slab floor that limits water access, and the flooring is 8-10 feet above the floor. There has to be a lot of moisture in a space that will affect the flooring so far from its intrusion point(s).
Most homeowners will have severe mold and major flooding well before the joists and beams are affected.
But as we mentioned before, crawl spaces don’t have a floor, and many don’t even have a basic vapor barrier (also known as a moisture barrier, we cover this in greater detail in Chapter 6 ).
The point is: when moisture creeps into your crawl space, it has to travel a maximum of 2-3 feet before it lands on a surface it can invade.
What Else Can Damage My Home’s Wooden Flooring Structure?
As I’m sure you’ve noticed, we’ve highlighted water’s wicked agenda since we started this conversation. But water doesn’t have to come into direct contact with your flooring to cause damage. Indirect moisture and humidity are often enough to kickstart the problems.
Wood is highly porous, which means it absorbs moisture easily. Damp wood will eventually rot and decay on its own, given enough time. But damp wood cultivates additional problems.
Termites Are Attracted to Damp Wooden Lumber
Unfortunately, damp wood is a delicacy to insects like termites. These nasty creatures will greatly increase the rate of decay in your flooring structure.
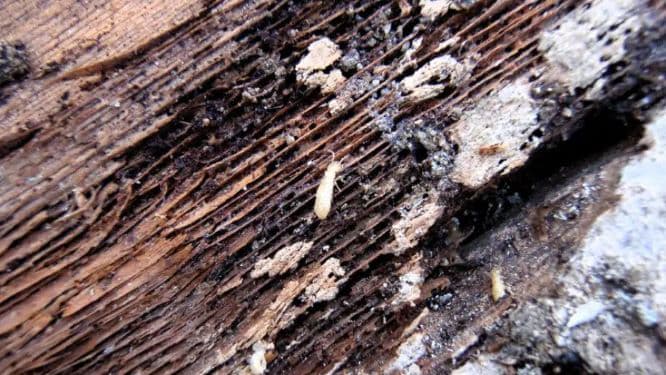
An up-close look at a termite feast (photo courtesy of Angie’s List)
If you suspect you have termites, we suggest a highly effective but low-tech testing method: the screwdriver test. Essentially, you press the tip of a screwdriver against the wood; if wood flakes up or the screwdriver sinks easily into the board, you have an issue.
Acculevel can help you by replacing damaged wooden components, but we don’t treat insect infestations. Exterminators have a completely different skill set than we do. But we know they should be licensed by your state’s pesticide regulatory agency, and we have an article that goes into detail about treatment options and how to find a qualified contractor that should help you.
Fiberglass Insulation Is Not Good For Crawl Spaces
Insulation is another factor that can contribute to decaying floor structures. At one time, builders thought that fiberglass insulation was a good choice for use in crawl spaces. We’ve since discovered this is wrong.
Fiberglass insulation, that pink or yellow batting that looks like itchy cotton candy, is an absorbent material. It can accumulate moisture in a humid crawl space and hold onto it. This is a ‘lose-lose’ situation.
First, because when the insulation absorbs too much water, it becomes heavy and falls down. This leaves your floor under-insulated. So if you’ve noticed your HVAC unit is working harder in the winter and you still have to wear socks because the floor is cold- this may be why.
Second – and this is the more expensive downside – fiberglass insulation has usually been installed between floor joists. So until that insulation becomes heavy enough to fall down, there are damp “sponges” pressing against your flooring components.
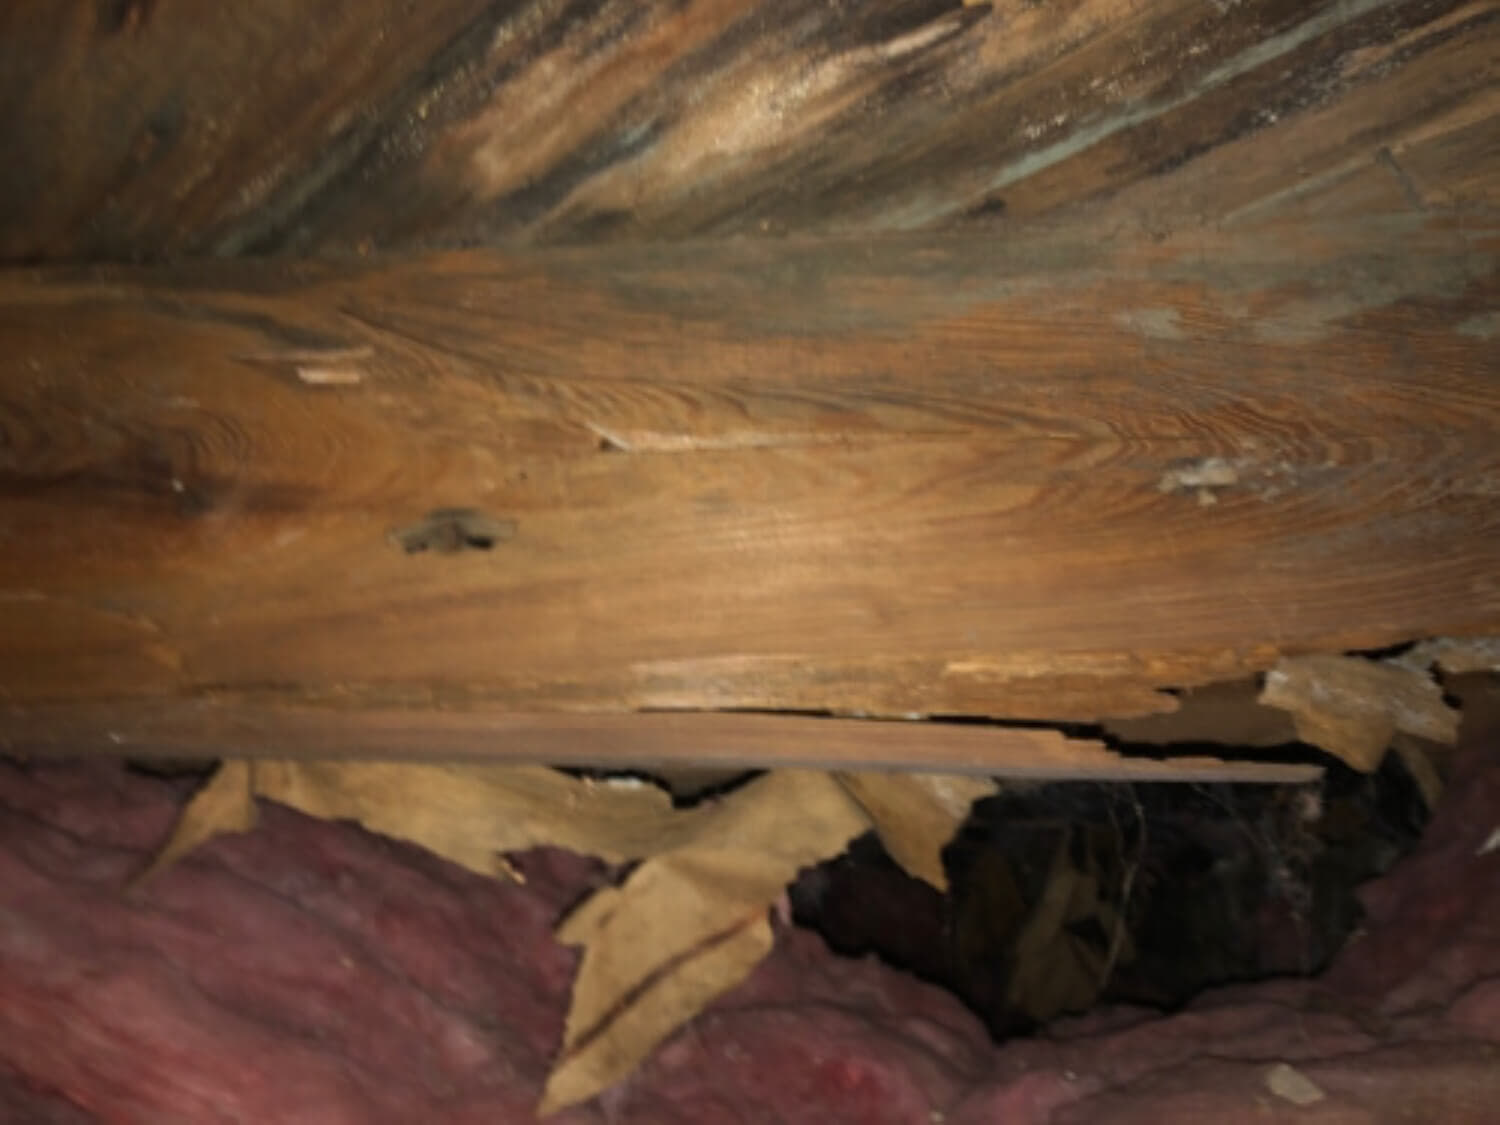
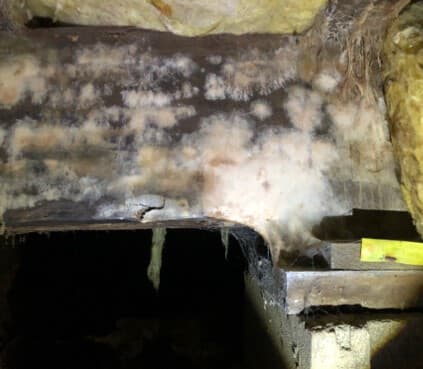
A decaying floor joist, with saturated and falling insulation. This photo was taken by an Acculevel project advisor during a free estimate appointment.
We strongly recommend that homeowners remove fiberglass insulation, and have it replaced with spray foam insulation. We explore this topic in this article that gives you seven reasons spray foam is the better choice for a crawl space.
Now that you know what could be causing your floors to sag, let’s diagnose the issue and determine the solution.
Chapter 4. Your Flooring Structure: Components, Symptoms, & Repairs
We can diagnose some of the problem just by determining how and where the floor is sagging. To help demonstrate this, we’re going to review all of the major components of your wooden flooring structure.
Center or Main Beam
How to Know if You Have a Center or Main Beam Issue
If your floor is sloping towards the center of your home, this is a sign of a damaged or sagging main beam. A visual inspection is the only way to know if the beam is damaged, if the support columns are failing, or both.
The illustration below shows how the main beam runs the full length of your home. You can see that the ends rest on the sill plate. What isn’t visible is that the bulk of the beam is held up by support columns. These supports can be made of cinder block, brick, wood, or even steel.
FYI: If there are steel beams or jacks under your main beam, there’s a good chance that a previous homeowner had the old supports replaced (steel floor jacks are the standard repair material).
During your home’s initial construction, the main beam was firmly placed across its supports, with the ends secured to the sill plate. Next, the floor joists were installed across the main beam. The subfloor, usually made of particle board or plywood, was then nailed to the joists.
This process is effective at keeping the subfloor in place. And that’s important because your carpet, tile, or hardwood uses the subfloor as its base. However, the subfloor can make repairs difficult if the floor joists or band joists become damaged. We’ll explain how we work around that issue a little later. Right now, let’s tackle what’s at the center of your flooring structure.
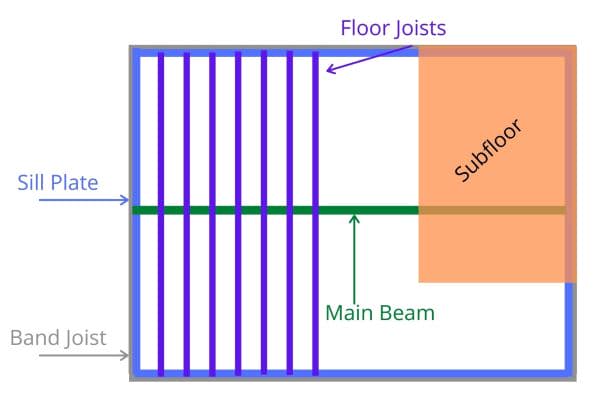
This is an illustration of the flooring structure as it would appear from above the floor. (Image created by the author)
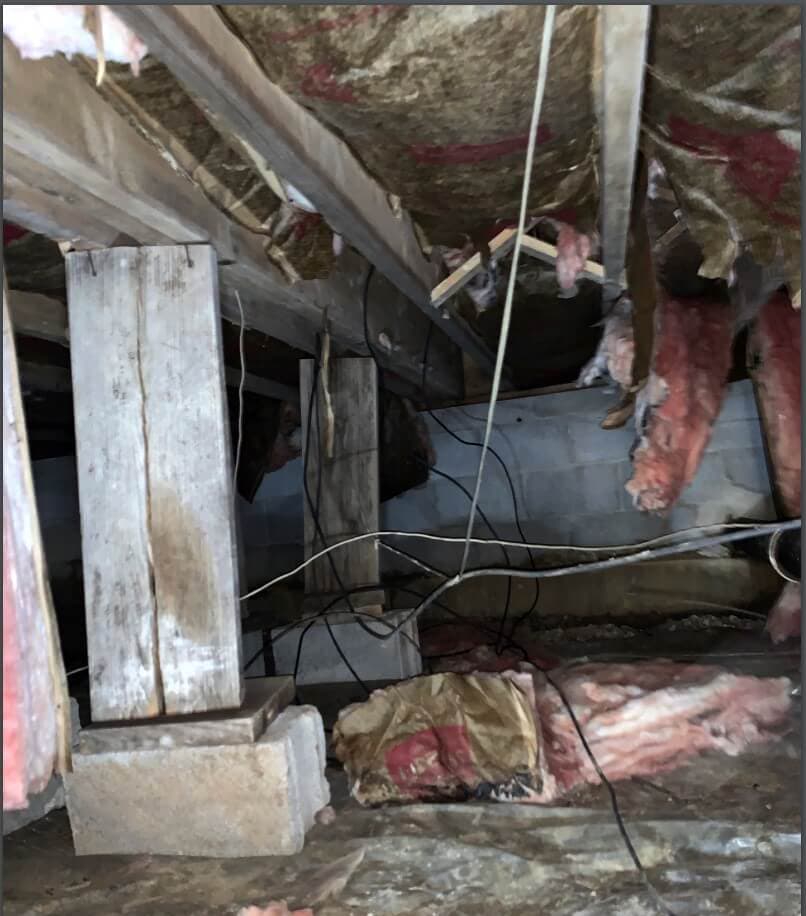
This photo was taken by an Acculevel project advisor during a free estimate appointment.
In the picture above, you can see that this crawl space has some serious problems. Moisture has been seeping in, and it’s affected several components. The fiberglass insulation is failing; strips of it are coming out of the packaging and falling to the ground. But more concerning is that the support columns are cracking and leaning. This is certainly why the floor is sagging!
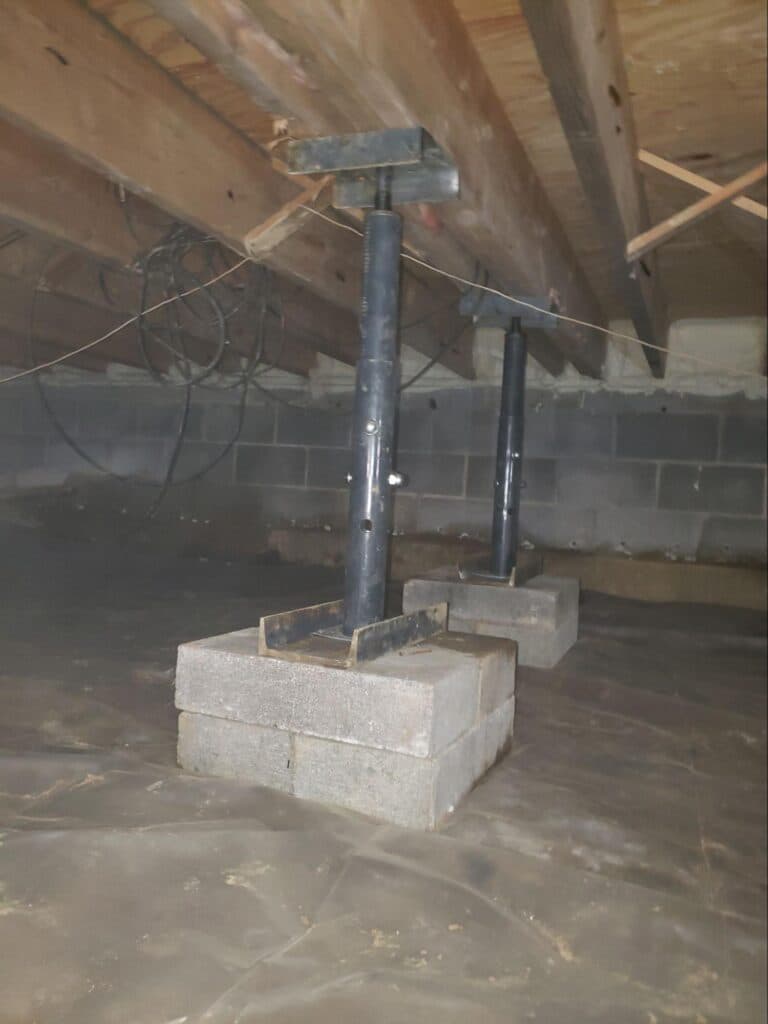
This photo was taken by an Acculevel crew member, after repairs were made.
How Main Beam Problems Are Repaired
Believe it or not, this is the same crawl space. The main beam was in good condition, so we only replaced the failing support columns. To do this, floor jacks were temporarily installed to hold the beam secure. The old columns were removed, and new steel jacks were set in their place. Replacing old columns with new jacks costs $500-$550 per jack.
If the beam also needed to be replaced, we would have done this with a steel I-beam. These cost $260-$280 per foot. You can further explore how floor stabilization works here.
We also removed the failing insulation and replaced it with spray foam. Spray foam doesn’t need to be sprayed along every joist like fiberglass. Foam only needs to be installed along the band board, between the joists.
What if your floor doesn’t sag in the middle, though? Maybe it slopes towards the outside wall? That indicates an issue with the sill plate or band joist.
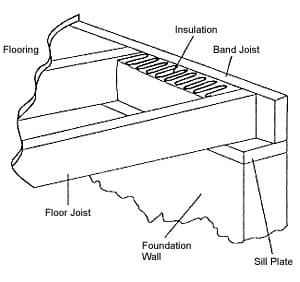
Illustration of a typical structural wood framing system, courtesy of NCSU.
Sill Plates & Band Joists
We’re going to explore these two parts in one section, because it is highly likely that if one is damaged, so is the other.
How to Tell if You Have a Sill Plate or Band Joist issue
If your floor is sloping towards an outside wall of the home, it’s likely your sill plate and/or band joists are damaged.
The sill plate is the critical first piece of your flooring structure. It is also one of the most vulnerable components, because it has direct contact with the ground. The sill plate is installed on the top of your foundation wall, and everything else rests on top of it.
The band joists may also be called band boards or board joists. At Acculevel, we most frequently refer to them as band boards- but this isn’t because it’s a better or more accurate term. It’s mostly a function of regional vocabulary and the fact that we’ve all been trained by the same person (founder & CEO Andy Beery).
The band board is attached along the outer edge of the sill plate, and may also be in direct contact with the ground.
How Sill Plates & Band Joists Are Repaired
If a sill plate has sustained water damage, it needs to be replaced.
To do this, floor jacks are temporarily installed to support the weight of your floor. Once the weight load has been transferred, it’s safe to remove the damaged board and replace it. Depending on the severity of the damage, you may need a large section replaced.
However, if the damage occurred because of a leak, and it’s localized to one area, the repair section could be much smaller. Sill plate replacement is $100-$115 per foot.
Band joists are not replaced; they are sistered. This means that a healthy board is placed next to the damaged section, and the two pieces are attached.
You may wonder, “Why don’t we just replace the band board?” For the same reason we don’t replace floor joists (next section): your subfloor and actual in-home flooring are both attached to the band board. Removing the old one can cause damage to the parts above it, and create additional expenses for you.
By sistering the two band boards, the healthy one takes over the workload without risking any damage to the subfloor. Sistering a band board costs $40-$50 per foot.
Floor Joists
These are probably a component you’ve heard of before. These are the boards that span your floor, from the main or center beam (pictured below) to the band joist. Floor joists are not in direct contact with the soil around your foundation, but they are often damaged by fiberglass insulation installed between the joists.
How to Know if You Have a Floor Joist Issue
When your floor joists are damaged, they cause drops or weak spots in your flooring. You may notice a section of your floor has more ‘give,’ or feels bouncy or soft.
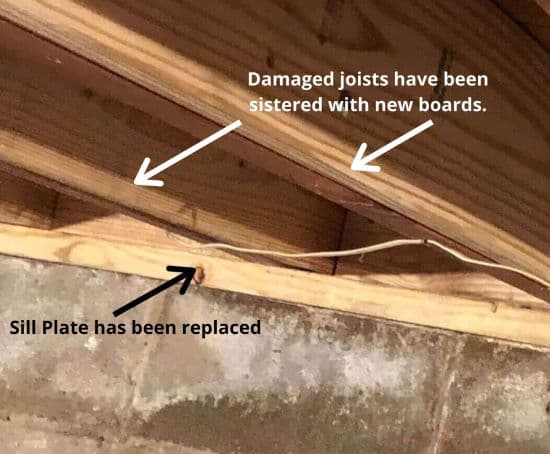
This photo was taken by an Acculevel crew member after making repairs.
How Floor Joists Are Repaired
Floor joists are repaired by sistering, just like band boards are. Sistering allows us to avoid the risk of damaging your subfloor or the carpet/hardwood you have in your home.
However, floor joists are a lot cheaper to sister than band boards. You’ll pay $11-$15 per foot for a floor joist repair. This is largely because it is so much easier to sister a floor joist. There are more joists sharing the workload, so we can repair with fewer temporary jacks. Floor joists are also easier to access; we can often slide a joist sister in place without moving significant wiring or ductwork.
What we’ve explored so far is the possible causes and repair methods for the structural damage to your wooden flooring structure. But there’s another kind of damage that may have occurred, and that one is biological.
Chapter 5. Biological Growth is a Health Hazard
In the introduction, we talked about how damaging moisture can be for your crawl space. We’ve explained the negative effects it has on your floor. But really the negative effects don’t stop there. There’s much more at stake; moisture threatens the health of you and your family.
Moisture is An Equal Opportunity Problem
Moisture can get into any home- and we do mean any home. We have seen moisture problems in homes of all ages, all sizes, and in all places. This means any home can develop mold, mildew, fungus, and other biological growths that are harmful to our respiratory systems.
As a general rule, crawl spaces don’t have floors. Once the builder has the foundation in place, they start building onto it. This leaves the ‘floor’ to be the bare ground of the housing lot.
This is convenient for the builder and reduces foundation costs for both the builder and homeowner. But it also means water has a relatively easy path into the home. The age or quality of the building does not change that.
Growth Only Needs Moisture and a Food Source
Mold and other biological growths are simple organisms with simple needs. All they need is a cool dark space, some moisture, and something to snack on (like dust). Do you know where you can easily find all three of these conditions? Yes, we just described your crawl space.
You might think, “well, that’s unpleasant, but it’s not in my house, it’s below it.” But is that true? Where does the air in your house come from? Where’s your HVAC unit? In most homes, the ductwork and vents directly connect the crawl space to your living space. This means the air quality in your home is directly related to the air quality in your crawl space.
So if you have unwanted organisms like mold and fungus in your crawl space, you’re breathing in their by-products: allergens.
This photo was taken by an Acculevel project advisor during a free estimate appointment. Biological growth is covering the wooden main beam.
Allergies are common and can be severe.
You’re probably familiar with allergy symptoms; even if you don’t have any, you’ve probably heard about them from friends, family, or even an advertisement for allergy medication. But the most common ones mimic cold or flu symptoms:
- Nasal and sinus congestion
- Eye irritation
- Blurred vision
- Sore throat
- Chronic cough
- Skin rash
These are fairly manageable, with the right medications. But they are frustrating symptoms to live with on a daily basis. Being congested 365 days a year will wear down anyone. The larger problem is that even if you don’t have any allergies or symptoms, you can still suffer the effects.
Long Term Exposure to Biological Growth Hurts Everyone
Biological growth is a health hazard for everyone- even 100% healthy people. You don’t need to have underlying health conditions or respiratory problems to develop illness or breathing difficulties.
The National Institute of Occupational Safety and Health performed a study on employees working in a water-damaged office building. The results documented a correlation between developing asthma and the increasing mold levels in the building. So it’s possible for healthy adults to develop asthma from long-term exposure.
For children under 12, whose immune systems are still developing, the chances of developing asthma increase significantly. The NIH has documented studies that mold exposure during the first year of a child’s life can increase their risk of developing asthma.
Of course, mold, bacteria, mildew, and other biological growths are worse for someone who has a compromised immune system or ongoing respiratory issues. Asthmatics can suffer from flare-ups, which are prolonged or repeated asthma attacks that can require hospitalization if medications don’t have the needed effect.
And someone with a compromised immune system or preexisting lung condition is susceptible to infections and other pulmonary ailments. This is especially true now that people increasingly work from home or safely distance themselves from others due to health concerns.
Chapter 6. Treatment Options for Biological Growth
There are several ways biological growth can be treated, but all of them should be done by professionals. The Environmental Protection Agency recommends that any mold problem larger than 10 square feet be examined by an expert.
Please be safe! Do not use bleach to clean wood or concrete surfaces. Bleach is only a safe and effective cleanser when properly used on non-porous surfaces; in small or enclosed spaces, the fumes are a breathing hazard for those with allergies or asthma.
Anabec
Biological growth is a health risk, and in many cases, the chemicals used to treat the growth can be just as hazardous. Acculevel has chosen to partner with Anabec, a manufacturer of premium cleaning chemicals that are designed to treat and prevent mold with the smallest environmental impact.
In our experience, these are the best products to use for residential homes. Anabec products are designed to thoroughly accomplish the necessary tasks, while keeping in mind the safety of your home and its surroundings.
You have probably noticed that we have used the term “biological growth” instead of mold. This is because there are a number of biological organisms that flourish in a crawl space besides just mold. The treatment methods will vary, depending on the type and severity of the growth. We offer a more detailed discussion of these cleaners, treatments, and pricing here.
Vapor barrier
A vapor barrier (sometimes called a crawl space liner) isn’t a treatment for biological growth, but it is a good first step in reducing the amount of moisture and gases that get into your crawl space. Your builder probably installed one when the foundation was completed.
A vapor barrier is a heavy piece of plastic that works as a physical barrier against vapors, gases, moisture, and odors that come up from the earth. Many of these gases are harmless, and occur naturally- oxygen, carbon dioxide and nitrogen are all to be expected. As water moves in and out of the soil, the gases are pushed into the air.
However, there are some gases that can cause serious harm. These are referred to as volatile organic compounds (VOCs), and are not something that a typical contractor can work with. If you are concerned about air pollution where you live or work, please contact your state’s health department.
Vapor barriers are not a permanent, one-and-done solution. The plastic will dry out, degrade, and crack over time. You should have the vapor barrier replaced on a fairly regular basis (every 5-10 years). Acculevel uses a 6 millimeter thick plastic. The cost for this is approximately $1 per square foot.
Dehumidifier
Like a vapor barrier, a dehumidifier isn’t a direct treatment for biological growth. But having a quality whole-home dehumidifier can eliminate one of the contributing factors: moisture. If excess humidity is removed from the crawl space, it kills many types of biological growth that can harm you and your family.
A study done by ASHRAE (American Society of Heating, Refrigerating and Air-Conditioning Engineers) demonstrated that there are many harmful organisms that thrive in an environment with far too much – or way too little – humidity.
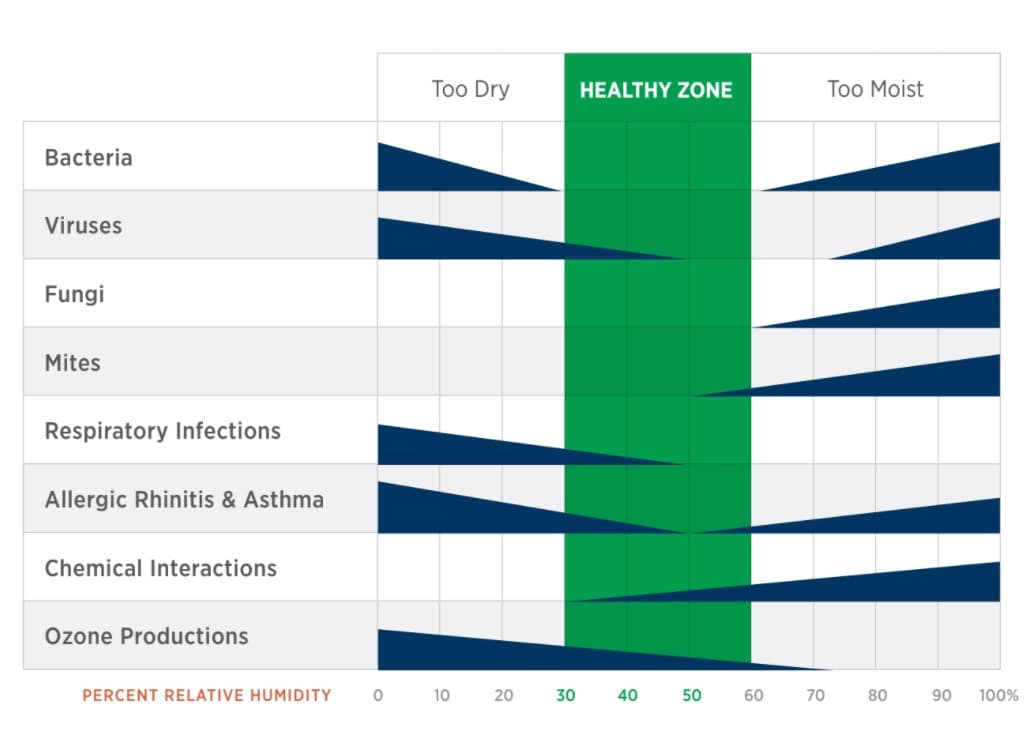
This chart shows the results of the ASHRAE study.
You can see in the chart that 50% relative humidity is the “sweet spot” for cleaner air. Controlling the humidity level in your crawl space is an essential part of having a healthier home – and a major step towards a healthier family.
A whole-home dehumidifier comes with other benefits, too. Drier air feels cooler in the summer than humid air, so you can adjust the air conditioner up a degree or two and lower your utility bill. It also reduces the workload on your HVAC (drier air is easier to process), saving you wear & tear on an expensive appliance.
At Acculevel, we install dehumidifiers with a capacity of 95 pints (45 liters) for $2100-$2300 (that pricing includes full installation). This model comes with a 5 year warranty, is made in America, and has an average life span of about 15 years.
While a dehumidifier is great for controlling the moisture in the air, it can’t remove actual water that seeps into your crawl space. For that, you need a waterproofing system.
Chapter 7. Waterproofing Your Crawl Space
Many of the forces that affect your foundation are natural, and completely out of your control. One of the biggest ones is the height of your water table. The water table refers to the level in the ground where the soil is fully saturated with water.
If you live in an area near a pond, creeks, or other body of water, your water table is probably only a few inches deep. Drier locations can have a water table that starts a foot or more below the surface.
Another significant factor is rainfall. If too much rain falls and the ground can’t absorb it all, the water moves towards wherever there’s a lack of resistance in the soil. Unfortunately, that includes into or through your foundation.
Too Much Water Creates Problems
Whenever you get too much rain, your foundation is going to struggle. “Too much rain” isn’t a specific number of inches, or a given number of rainy days in a row. For homeowners, too much rain is any amount past what the soil can reasonably absorb.
When this excess water presses against your foundation, it creates something called hydrostatic pressure. Concrete is a porous material, so water has the ability to get into – or through- your walls. This pressure often causes cracks. We’ll talk more about foundation damage and repair methods in Chapter 10.
Hydrostatic pressure is an industry term for water pressure. When excess water comes into contact with your foundation walls, it pushes against them. This makes your foundation function like a dam, which is not what it’s designed to do.
Right now, we’re going to focus on the other, more obvious vulnerability in your crawl space: the floor. Water has an easy access point because crawl spaces don’t have concrete floors to keep water out. All it has is a dirt floor with (maybe) a vapor barrier covering it.
That vapor barrier helps with blocking odors and small amounts of moisture. But a sheet of plastic isn’t going to stop excess rainfall from getting under your home. And if the crawl space is wet and developing puddles? You’re going to develop major problems that can include mold and bacterial growth, insect infestations, sagging floors, and a damaged foundation.
So how do you keep water from collecting in your crawl space? Waterproofing.
How Do You Waterproof a Crawl Space?
To start with, waterproofing does not mean completely eliminating water from your home. (That’s encapsulation, and we’ll explore that a little later.) Waterproofing is managing the water that gets into your crawl space.
This is done by installing water drainage called GeoChannel, and routing the drainage to a sump pump. The sump pump collects and expels the water as it accumulates, out of your home through a discharge line.
Why Use GeoChannel?
When you’re installing water drainage into a dirt floor, one of the most important concerns is clogging. GeoChannel is entirely wrapped with cloth that filters out dirt and debris, so only water gets into the actual channels in the center of the drainage.
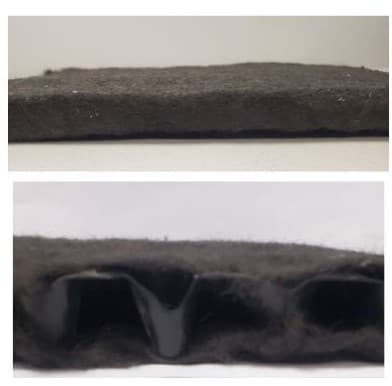
These photos were taken by the author. The top is GeoChannel as viewed from the side, the bottom from the end.
We are confident that this drainage system won’t clog; in fact, Acculevel warranties our crawl space water drainage system for the life of your structure. Our warranties are also fully transferable, and do not require any paid maintenance plans.
To install the drainage, we dig a trench around the perimeter. A layer of gravel is placed in the trench, then the GeoChannel, then covered with more rock. We use the gravel for two reasons: first, to add another filtering component and second, to keep the drainage in place.
The drainage is connected to a sump pump pit. This is essentially a shallow well dug into the crawlspace. A heavy-duty plastic pit liner (shaped like a large bucket) is inserted, then the pump is placed and attached.
Water drainage costs between $20-$30 per foot, and sump pumps are $2,000-$2,500. These prices include everything- installation, labor, and materials. If you need more pricing information, we detail what factors can affect your waterproofing costs.
What is the Best Sump Pump?
At Acculevel, we install Wayne brand pumps. Wayne Home Equipment originated in Fort Wayne, Indiana – just a few hours north of Acculevel’s home office. They are an American manufacturer, and a dominant force in the industry.
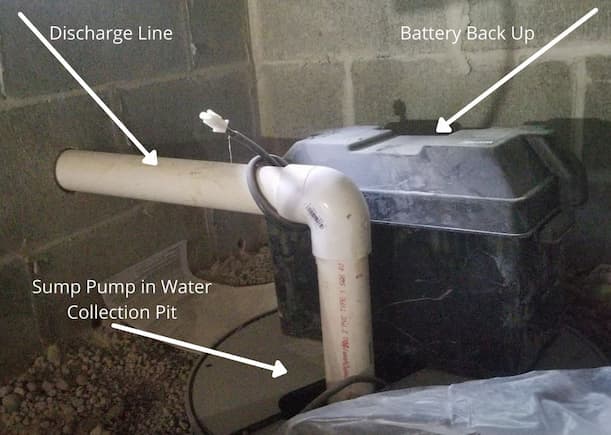
All of the sump pumps we install include a battery backup. We consider a battery backup an essential component and recommend that every homeowner have one, especially those of you who live here in the Midwest. Why? Because the number one time you need your sump pump to run is in the middle of a thunderstorm. And when is the number one time you lose power? During a thunderstorm. A battery backup can literally be the difference between a flooded home and a dry one.
How Does the Discharge Line Work?
The final piece of the water drainage system is the discharge line. This is how the sump pump gets the water out of your crawl space. The discharge line is installed in your yard, buried 4-6 inches deep. It is at least 10 feet long, to make sure the water removed from your crawl space isn’t draining near your foundation.
This photo was taken by an Acculevel crew member, after waterproofing was installed. (You can also see gravel around the perimeter, which is covering the GeoChannel drainage.)
Once the waterproofing system is installed, you will still need to have a vapor barrier in place. While the crawl space liner isn’t helpful for water removal, it does help with your home’s overall air quality. The barrier prevents odors and vapors that evaporate from the ground from going directly up into your home.
Speaking of air quality… We explained the value of a whole-home dehumidifier in Chapter 6. A dehumidifier is often the game changer in a musty-smelling home. When used in conjunction with a good waterproofing system, it provides cleaner and clearer air.
If cleaner air is your desired end goal, you’ll want to expand your plans past a vapor barrier, and invest in encapsulation.
Chapter 8: Encapsulation
Encapsulation can turn your crawl space into a space so clean and dry that you can use it for extra storage. It’s the ideal option for anyone with severe allergies, asthma, respiratory illnesses, and immune system deficiencies. So what is it?
Encapsulating your crawl space requires a liner to completely cover the walls and (dirt) floor. This liner is not a typical liner like a vapor barrier; it should be much stronger and more durable.
At Acculevel, we use a woven material made of 100% virgin resin polyethylene that is highly resistant to punctures or tears. It’s also inorganic, so biological growth like mold, mildew, and bacteria can’t grow on it.
This photo was taken by an Acculevel crew member after encapsulating a crawl space.
Before your crawl space can be encapsulated, it needs to be waterproofed. Once that’s completed, the encapsulating liner is placed along the walls and floor. You can see from the photo above that even the individual support columns under the main beam are wrapped in the material. This helps to ensure water doesn’t wick up the columns and get into the crawl space.
The liner is secured in place, and spray foam insulation is used to seal any gaps or openings along the perimeter. Once this is complete, a dehumidifier is installed to remove any humidity that develops.
A whole-home dehumidifier does not need to be emptied like a small portable one. Instead of collecting water in a removable tank, it has a discharge line that is routed to the sump pump pit where it drains out with any other rainwater that collects.

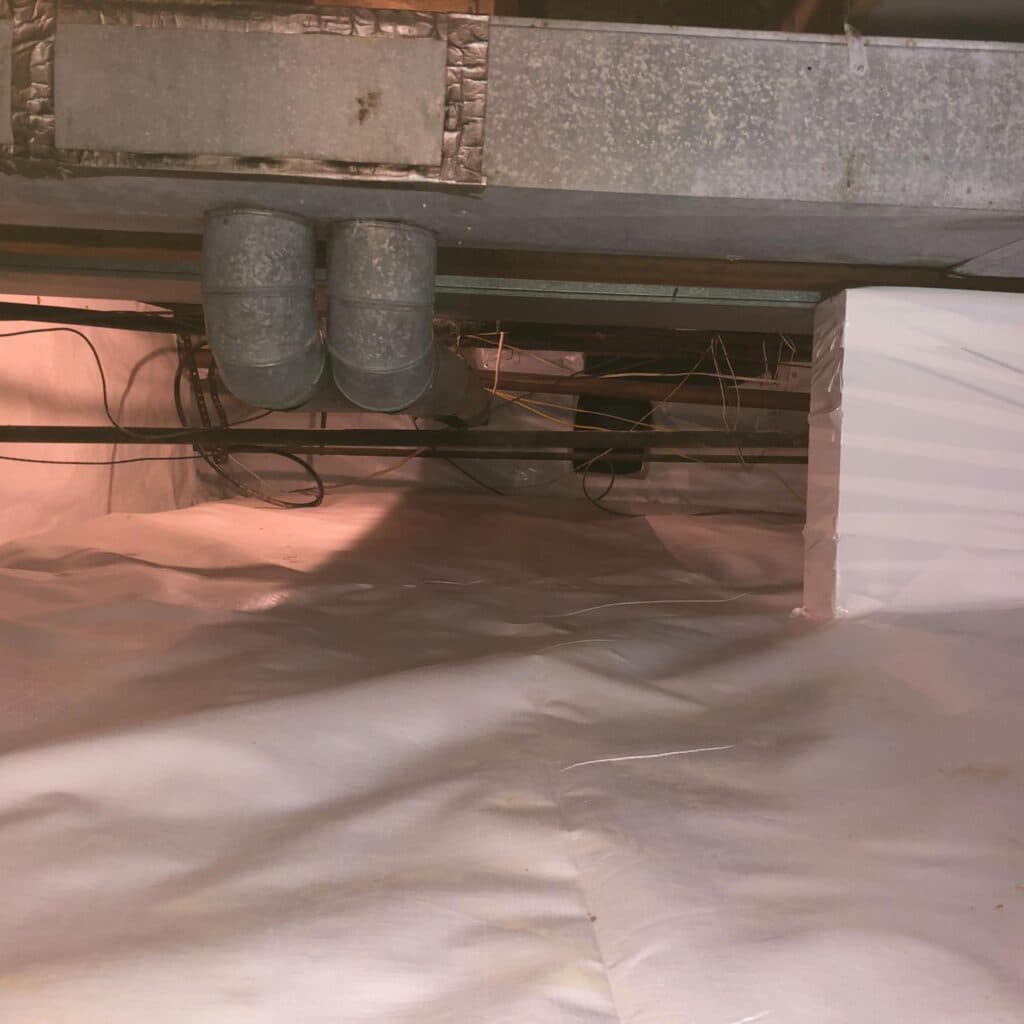
This photo was also taken by an Acculevel crew member after encapsulation.
In this photo (above), you can see the dehumidifier’s water line is routed into the sump pump pit. Also, if you look closely at the far wall, you’ll notice some yellow-tinged puffy material above the encapsulation liner. This is spray foam insulation, which seals out drafts, helps secure the liner to the wall, and repels water.
Encapsulation Also Improves HVAC Efficiency
An additional benefit of encapsulation- besides potential storage space and clean air- is that your HVAC system should be more efficient. Once you’ve eliminated drafts that compromise your home’s temperature and nullify the humidity, the air in your home is cleaner and drier.
Drier air is easier for your HVAC to process, meaning that it won’t have to run as often to maintain temperature. Dry air also feels cooler than humid air. This means it could be possible to increase the average temperature in your home in the summer, without sacrificing comfort. All of these things mean less wear and tear on the HVAC, prolonging its life.
Encapsulation = cleaner air + better health + lower utility bills. That’s an equation you have to like, even if you hate math. And speaking of math…
Encapsulation Costs
Like the cost of water drainage, encapsulation pricing depends on the size of your home’s crawl space. To give you an idea of the cost, encapsulation from Acculevel is between $3-4 per square foot, and comes with a 25 year warranty.
Something else you need to consider, if you want to encapsulate your crawl space, is the entrance to the space. If the entrance is inside your home and conveniently located, that’s great! But if the entrance is outside the house and in poor condition, or through the floor of a very full closet that you hate emptying, there are alternatives.
Chapter 9: Crawl Space Entry
If you want a new or improved entry to your crawl space installed inside your home, you’ll need a good general contractor.
But if you don’t want the entrance inside the home? Or if it’s an outside entrance that’s poorly located? A quality foundation repair company like Acculevel can create a new outdoor entrance for you.
The door that covers an outdoor entrance is also very important. If you’re using your crawl space for storage, you’ll want an entryway that can be locked. But even if it doesn’t need to be locked, the crawl space door should be in good condition.
A deteriorating or missing door is an invitation for animals to nest inside your crawl space. Worse, if the door is made of rotting wood, it can attract insects like termites to your home.
There are two entry door options that Acculevel offers, and both are more durable and longer-lasting than a wooden door.
Insulated Steel Door
The first option is an insulated steel door, which is much more durable than the wooden options. It will eventually rust and degrade, but won’t attract termites. If your crawl space is below grade, you may also need a window well installed, to keep it accessible.
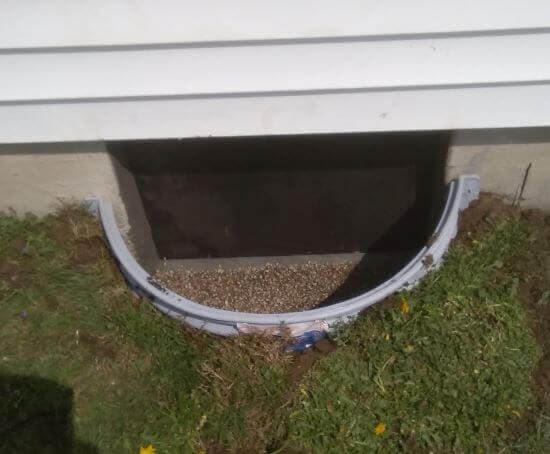
This photo was taken by an Acculevel crew member, after the well and door were installed.
Turtl Entrance
If you are encapsulating your crawl space and want to be sure of a watertight seal, you want to install a Turtl. This is the brand name for a vinyl entryway that can be padlocked, built up to the needed height for your home, and makes for a clean and comfortable entrance.
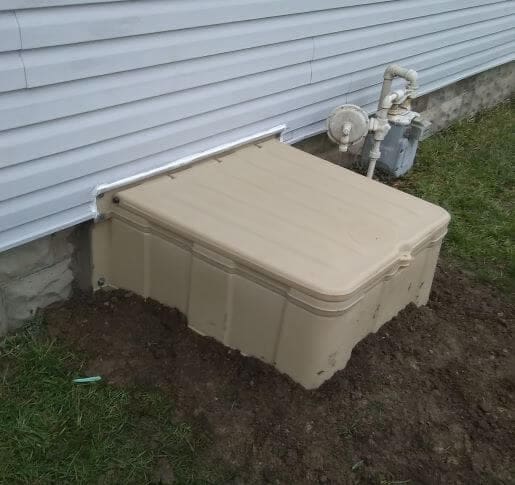
This photo was also taken by an Acculevel crew member, after installing a tan Turtl.
If you would like more detailed information about these options, as well as pricing, we have an article that directly compares the two models.
What if your entryway is fine, but you have concerns about your crawl space’s overall health and stability? That’s our next destination on this particular track.
Chapter 10: Crawl Space Foundation Problems
If you’ll think back to the end of Chapter 2, I warned that “if you don’t manage the water getting in? It will create problem after problem after problem for you.”
We’ve discussed how water damages the wooden flooring structure, attracts pests, feeds biological growth and corrupts air quality. But it can damage your actual foundation, as well.
Erosion Can Undermine Your Home’s Foundation
You probably learned in science class that water causes erosion. When erosion involves your home, it’s rainwater seeping into the ground and moving the soil. It can carry small particles of soil away with it- especially if you have granular soil, which has more individual pieces (grains) of soil and sand.
As erosion moves soil away from your foundation, the foundation shifts, sinking farther down into the ground. If the soil was magically eroded the exact same amount all the way around your foundation, this would be okay. But erosion doesn’t happen evenly; it’s usually one side or one corner of the foundation that’s more affected than the others. In our industry, we call this uneven sinking/shifting of the foundation settling.
When your foundation settles, it creates a strain across your entire home. This doesn’t happen because there’s anything wrong with your home. It’s a natural result of how houses are constructed. Your home is built to hold tightly together- all of the materials are rigid and strong: concrete, steel, wood, bricks, etc.
None of these materials are flexible; they are not designed to stretch or bend. So when one part of the foundation sinks more than the others, it pulls at the foundation that hasn’t moved. What happens when you pull on a material that doesn’t stretch? It struggles to hold together, often cracking before breaking.
3 Signs of a Settling Foundation
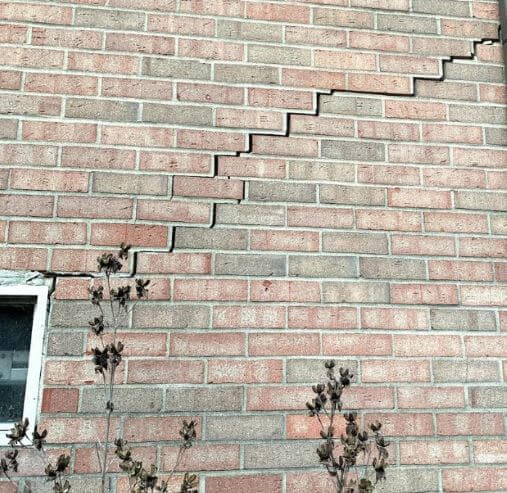
- A break in your foundation translates into a crack. Exterior cracks in your foundation are often a sign of settling. The cracks form as the wall separates because it can’t stretch. Not every foundation crack is a sign of settling, but if it follows the shape of the outside blocks in a zig-zag pattern? It’s most likely settling.
 This photo was taken by an Acculevel project advisor during a free estimate appointment. The corner of this house is settling, pulling it down and away from the rest of the structure.
 - In the picture above, you’ll notice that the crack starts at a window frame. This brings us to the second symptom – sticking doors or windows. Door and window frames are made of wood, which can twist or warp under the strain of a settling foundation. When the frame shifts- even just a little bit- it causes problems for the door or window inside. It may not open or close properly, or it may not stay open/closed without assistance. When you see an exterior crack like the one above, you should check the door or window where it originates. This combination of the two is a very clear indicator of a settling problem.
- The third major symptom of settling can be a little harder to detect. Cracks in the interior drywall can be caused by other issues. For example, if the crack is straight and follows a seam, that’s probably just poorly installed drywall. But if the drywall crack is spidery across your ceiling, or originates at a sticking door or window (mirroring the outside crack)? That’s another sign of settling.
 This photo was taken by an Acculevel project advisor during a free estimate appointment. The corner of this house is settling, pulling it down and away from the rest of the structure.
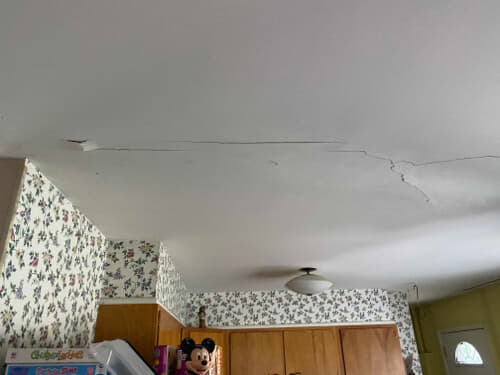
This photo was taken by an Acculevel project advisor during a free estimate appointment. This crack in the kitchen ceiling is a sign of the foundation settling.
How Do You Repair a Settling Foundation?
When you have a settling foundation, the primary objective isn’t to move the foundation back into its original position. You have to stabilize the foundation, and stop it from sinking any farther. If the foundation hasn’t settled too much, it may be possible to lift it back into position – but this depends on your specific circumstances.
The best way to stabilize a settling foundation is with helical piers. Helical piers are long steel posts that are driven into the ground like screws, until they reach the needed depth and stability. This is measured with a specialized pressure gauge system, and is usually between 15-20 feet down.
Once the pier is set, it’s then attached to the base of your foundation with a steel bracket. There is another type of pier, called a push pier, that some companies use for this purpose. These are not the best choice for homes and other residential properties; push piers use the building’s weight as leverage and this can harm your foundation if not done properly.
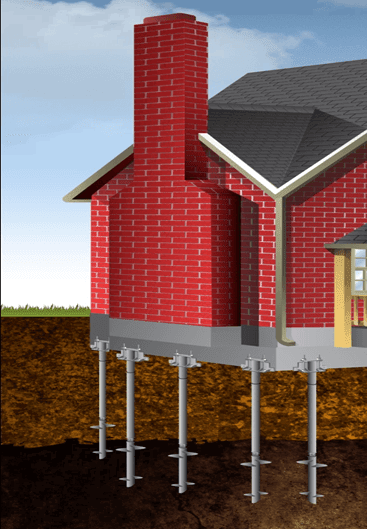
This is an illustration of helical piers.
Helical piers, when installed by Acculevel, are warrantied for the life of your structure. The costs can vary, depending on how many piers you need, if the piers can be done by machine or by hand, as well as the depth required. In the past year, homeowners have paid an average of $8900-9500 for pier installation.
Hydrostatic Pressure Can Damage Your Foundation
Water doesn’t have to be under your home to cause damage. It can create something called hydrostatic pressure, which is our industry’s term for water pushing against your foundation. This is especially a risk if you have expansive soil, which is more clay-based. Clay is slower to absorb water, but when it does, it expands and pushes outward.
Your foundation is built to withstand pressure from above, to hold up the weight of your home. It is not designed to resist pressure from the side. Heavy rains, or multiple days of steady rain, can fully saturate the ground around your home. Excess water, along with the pressure from expanded soil, can create cracks in your foundation.
Unlike settling cracks, these are clearly visible on the inside of your crawl space walls. They can be either long horizontal or zig-zag shaped, and these cracks don’t originate at window or door openings.
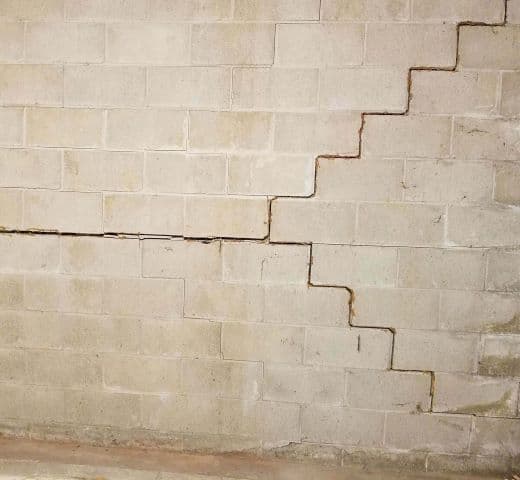
This photo was taken by an Acculevel project advisor during a free estimate appointment. This wall has cracked, and is beginning to bow inward.
In the picture above, you can see that both types of cracks are present. The hydrostatic pressure is pushing at the center of this wall, and the cracks are forming as the pressure builds. Once the wall begins to bow, the inward curve of the wall may be visible from the outside.
How Do You Repair a Bowing Wall in a Crawl Space?
Like repairing a settling foundation, the primary goal in repairing a bowing wall is stabilization. It is possible to straighten a wall, but it requires excavation along the outside of the wall. Most homeowners aren’t willing to deal with the mess -or the added expense- to straighten a crawl space wall. (In a basement where the space may be actively used, wall straightening is more common.)
If your wall is bowing less than 2 inches inward, the best way to repair it is with carbon fiber straps. Acculevel uses Fortress brand carbon fiber straps, which are four times as strong as steel. These straps are anchored to the top and bottom of the wall, and affixed with an epoxy rivet technology.
In the past year, homeowners have paid an average of $6600-$7900 for bowing wall repairs; the pricing depends on how many are needed and the method of repair. If your wall is bowing more than 2 inches, you will need wall anchors or helical tiebacks.
Check Your Symptoms
We have endeavored to cover all of the possible issues you may encounter in your crawl space. But if we’ve left anything out, or you’re still not clear on the significance of your home’s symptoms, we have another practical (and free!) reference for you to use. It’s our interactive symptom checker, which allows you to select specific concerns and research them in greater detail.

Chapter 11: How to Find the Right Contractor for Crawl Space Repairs
When you invite a repair person into your home, you have expectations. You expect that person to be respectful, understand your concerns, assess your home, and give you an honest and fair evaluation of the situation. These expectations seem reasonable, but the reality is that not everyone is interested in behaving ethically.
To help you “weed out” potential problems, we’ve developed a guide, Questions to Ask a Contractor. This article comes with a downloadable version – at no cost to you- that you can use when meeting with any contractor.
If you live in Indiana or the surrounding areas, schedule a free estimate with Acculevel! You can call 866-669-3349, or complete our contact form and let us call you.
If you don’t live in our service area, and you’re not sure how to find a good contractor, start with the Better Business Bureau. You can also ask the realtor agency who sold your home or your HOA; both often have lists of preferred vendors who have proven reliable. Some of your friends or neighbors may also have recommendations for you, especially if they live in your area or have a crawl space in their own home.