✕
What issue are you experiencing?
Cracks, water intrusion, crawl space moisture, settlement, etc.
Cracks, water intrusion, crawl space moisture, settlement, etc.
To properly install a French drain basement system, contractors must break up the perimeter of the concrete floor to allow for effective drainage. This system is installed beneath the floor, typically positioned on top of or adjacent to the foundation’s footer. The purpose is to divert water away from the foundation, reducing hydrostatic pressure and minimizing moisture accumulation in the basement.
Unlike some other drainage systems, French drains are usually not covered back up with concrete. Instead, they are either left uncovered or topped with a removable grate. This design makes maintenance easier, as it allows quick access to remove debris or buildup that could otherwise clog the drainage system.
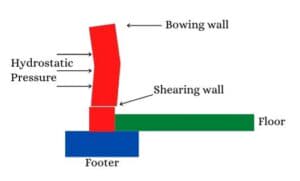
The concrete removed from the perimeter serves an essential structural purpose - it connects the foundation walls to the basement floor, providing stability and preventing foundation shearing. Shearing happens when hydrostatic pressure pushes against the foundation walls, causing cracks or shifts. Normally, the concrete floor anchors the walls in place, but when this concrete is removed and not replaced, shearing can occur lower in the wall, leading to more severe structural damage.
As shown in the diagram below, foundation shearing typically occurs at the second row of blocks or higher. This is because the floor slab is meant to secure the first row in place. However, when sections of concrete are missing, shearing can happen lower in the wall, making the damage more extensive and costly to repair.
To ensure effective basement waterproofing, our installation process includes breaking up the floor perimeter to install a French drain basement system. If the basement walls are made of concrete block, we also drill weep holes in the bottom row to allow trapped water to drain efficiently.
After drilling the weep holes, we install a dimple board along the bottom blocks.
This component directs water from the weep holes straight into the drainage system, preventing unwanted moisture from spreading across the basement floor.
The staggered dimple board design channels water downward while reinforcing the structural integrity of the wall.
Unlike traditional French drain installations, our system ensures that the perimeter is resealed with concrete after installation. This extra step helps reinforce the foundation, preventing potential shearing while maintaining the drainage system’s effectiveness.
Our approach delivers the best balance of waterproofing, structural protection, and long-term durability, making it a reliable solution for basement water management.
One of the main drawbacks of a French drain system is that it does not fully separate water from the air in a basement, leading to high humidity, potential moisture issues, and an increased risk of mold growth.
These subsurface drainage systems are designed to collect and redirect excess water runoff that enters through the foundation walls or seeps in at the floor-wall joint. However, because these drainage solutions remain partially open, they fail to completely seal out moisture.
Many perforated drainage systems are left exposed to allow for easy maintenance and clog removal.
While this makes sense from a water management standpoint, it does little to reduce basement humidity. Since standing water remains in contact with the air, moisture levels can rise, promoting biological growth like mildew and mold.
A well-designed waterproofing system should not only divert excess water away but also regulate indoor humidity levels to prevent structural weakening and protect indoor air quality. Wood rot, foundation erosion, and poor ventilation can all result from uncontrolled moisture buildup.
For the best long-term solution, installing a whole-house dehumidifier alongside a properly sealed drainage system can improve indoor air quality, prevent water damage, and ensure a healthier living environment.
At Acculevel, we often recommend integrating waterproofing solutions with moisture control measures to provide comprehensive protection for your property.
A French drain system depends on a perforated pipe to collect, transport, and redirect water safely away from the property. However, as water flows through the drainage trench, it also carries silt, soil, and debris. 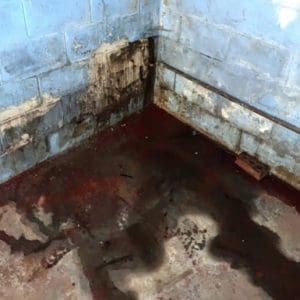
Over time, these materials accumulate inside the system, leading to clogs, backups, and reduced efficiency.
Since gravel is used as a filtering medium, it helps block larger debris from entering the drain pipe. However, smaller particles often pass through, gradually building up inside the underground drainage and reducing its effectiveness.
This is why many traditional drainage systems are left open, allowing contractors, homeowners, or landscapers to identify and remove blockages.
At Acculevel, our fully enclosed waterproofing system is reinforced with concrete, effectively eliminating the risk of clogging while ensuring long-term durability.
Unlike traditional open drains, this sealed system prevents soil infiltration, reduces maintenance needs, and enhances overall performance.
By integrating modern drainage technology, we help homeowners, contractors, and real estate professionals achieve efficient and long-lasting waterproofing solutions.
For homeowners seeking a more reliable basement waterproofing solution, a fully sealed under-floor drainage system offers the best protection against moisture buildup, foundation damage, and clogged drains.
While a French drain basement system effectively redirects groundwater, it may leave parts of the system exposed, increasing the risk of debris accumulation and maintenance issues over time.
Our under-floor drainage system is designed to eliminate these concerns by collecting water through strategically placed weep holes and directing it into a covered drainage system. This approach not only prevents moisture exposure but also helps maintain the structural integrity of the basement walls.
By fully sealing the system, the risk of hydrostatic pressure buildup, mold growth, and foundation shifting is significantly reduced, making it a more effective alternative to traditional French drains.
Choosing the right waterproofing system is essential for protecting your basement from moisture damage, structural issues, and unnecessary maintenance. At Acculevel, we specialize in durable and effective drainage solutions tailored to your home’s unique needs.
Our experienced project managers will assess your basement, discuss your concerns, and recommend the best long-term solution. Contact us today at 866-669-3349 or request an estimate to schedule a consultation. Let’s ensure your home stays dry, stable, and protected for years to come.
If you don’t live in our service area, please make sure you are working with an accredited and insured member of the Better Business Bureau. If you’re not sure where to start, we recommend asking neighbors, your local HOA, or the realtor you worked with on your home. All of these are good sources for finding someone reputable and trustworthy. You can also use our guide of questions to ask a contractor, to make sure that you find the right contractor for you.
[DISPLAY_ULTIMATE_SOCIAL_ICONS]