Do you have water getting into your basement? Do you know how to manage it, get rid of it, and solve your problem? Maybe you realize you’re evaluating basement waterproofing and you need to know as much as possible before you make a decision. If you find yourself in one of these situations, that’s all right- you’re in good company.
Here at Acculevel, we’ve been waterproofing homes in Indiana and the surrounding areas since our start in 1996. We wanted to create this exhaustive guide to answer all of the questions you might have around Kentucky basement waterproofing. You’ll learn the methods, components, options, and costs. We will start at the beginning, and we’ll guide you through the process, one step at a time.
Whether you’re a new homeowner or an experienced homeowner who’s never had a basement before, water intrusion is an issue you don’t think about until you experience it.
And even once you have water in your basement, it may not feel like much of an issue. If you only go into your basement to change the furnace filter every 3 months, it may feel like more of an inconvenience. It can be tempting to just ignore that trickle of water in the corner.
We would strongly recommend that you NOT ignore the (damp) elephant in the room. Address it promptly; water damage poses a threat to your health and your home’s health. Waterproofing is an essential part of protecting your investment.
Let’s start by clearing up a common misconception. To contractors, waterproofing is not the complete elimination of water. People generally think of it like waterproofing a pair of leather boots, applying a coating that sheds water. This is a good method for footwear, but your foundation is not as simple to treat as your boots.
Contractors aren’t applying a coating to the inside of your basement walls or floor; and if we did, that wouldn’t solve your problem for very long. It would only create different problems for you.
FYI: This is why we do not recommend using any of the waterproofing paints that are currently flooding the market. These only block the water from getting into your basement and can hold the water inside your foundation. They don’t do anything to remove the water from your foundation. By blocking evaporation, waterproofing paints can contribute to building hydrostatic pressure against your foundation and lead to potential deterioration.
Concrete, either in poured or block form, is a porous material. Water can -and will- seep from the soil into your foundation. If water is allowed to penetrate into your basement in a controlled fashion, a waterproofing system will contain and remove it from the basement.
However, if you have paint over the inside of your basement walls, or apply another type of water stopping material… your foundation will be forced to hold onto the water that seeps into it. This is not what you want. Water left sitting in the walls for long periods of time can cause them to crack, decay, crumble, deteriorate and mold.
By the time your waterproofing paint or sealant has been compromised enough for you to see this problem, it has become a BIG problem. If the concrete is saturated enough that paint is flaking off, your foundation is most likely starting to deteriorate.
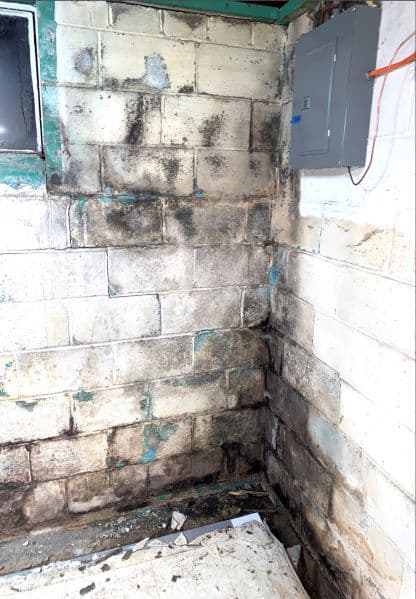 This picture was taken by an Acculevel project advisor on a routine free estimate appointment. Water damage and mold growth are abundant in this corner.
So, if waterproofing isn’t the elimination of water in your basement, what is it?
Waterproofing is the control and management of water that enters your home. This method uses drainage channels that are installed along the inside perimeter of your basement walls. (Drainage channels are somewhat like pipes that go under the concrete floor.)
These channels collect the water and direct it to a hole dug in the floor, called the sump pump pit. The sump pump then expels it out of your home, usually 10-20 feet away from your foundation.
FYI: A Sump pump is a machine used to move water out of your basement. It detects when water collects in the pit, and the pump kicks on to expel the water. The pump requires a standard voltage electrical outlet.
This method moves the water away from a point where it is pressing against your foundation and contributing to its decay. When homeowners first investigate waterproofing, they may view it simply as the method for removing the water from their basement. But through research, you will realize that alleviating the pressure that water generates against your foundation is also a critical part of this process. This pressure is called hydrostatic pressure, and we dive into that more here.
If your goal is to have a completely dry basement, one that can be finished and used as quality living space, you should consider encapsulation. We discuss that topic later in this guide.
This isn’t something we can answer definitively, because it varies from one home to another. But there are some common causes, mostly that arise after the natural passage of time.
Let’s quickly review how your basement was built:
Now that we’re familiar with the process and basic components, let’s review what can go wrong.
This all makes it sound like water leakage is inevitable. Maybe it is. And if so, you may be wondering why you should bother to waterproof your basement, at all? Why not just let it be damp? It’s tempting, and we know that- there are so many other things you could do with your money! But your house is your greatest investment, and ignoring water damage is going to hurt you and your home, creating issues that will cost you more down the road.
It’s pretty simple, really: water in your basement causes significant health problems for you and your home.
A cool, dark space with moisture is ideal for insects, pests and mold. Water can also create structural issues with your foundation, which can threaten the stability of your home. Water damage is a leading cause for sagging floors, foundation cracks, and settling.
In this chapter you’ll learn more about the issues that can arise in your basement and why waterproofing is so important. We will also discuss how waterproofing your basement will actually increase the value of your home.
When we talk about insects in a basement, we’re not referring to ants or spiders. Ants can be frustrating and tiresome to eliminate. Spiders may be super-creepy, but they are a beneficial insect that eats other pests (apologies to any arachnophiles in my audience, but eek!).
Neither of these cause damage like termites or powderpost beetles.
Flashback to high school science! Plants have cell walls that are made of a carbohydrate called cellulose. Cellulose is what provides the structure of a plant, kind of like skeletons for mammals. Cellulose is also what allows trees to grow tall and strong, until they’re harvested and turned into lumber for building houses.
Termites LOVE cellulose. They search it out, and build their nests wherever they can find a good source of it.
In North America, we have about 50 species of termite. Of those, only 18 species are the kind of pests that damage our homes or crops. But oh, boy! Those 18 species have earned quite a reputation, and rightfully so. They are the number one insect threat to your home.
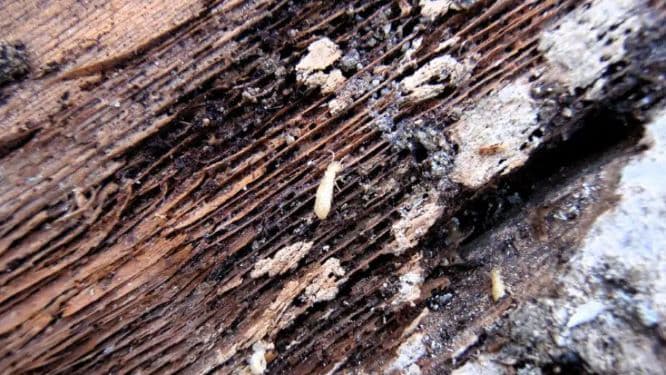 Photo is courtesy of Angie’s List, and shows evidence of termite damage.
Termites will dig into the wooden beams, joists, and sill plate that makes up your flooring structure. They can’t usually be seen directly- they burrow just under the top layer of the board, to keep a protective layer of wood between them and the world. This can give the wood a slight bubbled, or flaked look, to the surface.
The most reliable way for a homeowner to detect termite damage is from the soft or hollow spots in the wood. It’s not particularly scientific, but you can use a screwdriver to push on joists or other beams that you suspect have an issue. If the board “gives way” easily, you have an issue.
Angie’s List has more details about termite types and detection. This article also mentions watching for mud tunnels: these are paths the termites build on concrete to move from one section of wood to another. And in the spring, you may also see them ‘swarming’ as they look for new places to build a colony.
Powderpost beetles are second only to termites in their ability to damage dry, seasoned wood. But for all the havoc they wreak, they’re far less infamous to homeowners. I found fewer sites that give objective details about the methods for diagnosis and detection of beetles.
But the Entomology Department at the University of Kentucky has an excellent article that is easy for non-scientists to read, provides details and photos, and makes treatment suggestions.
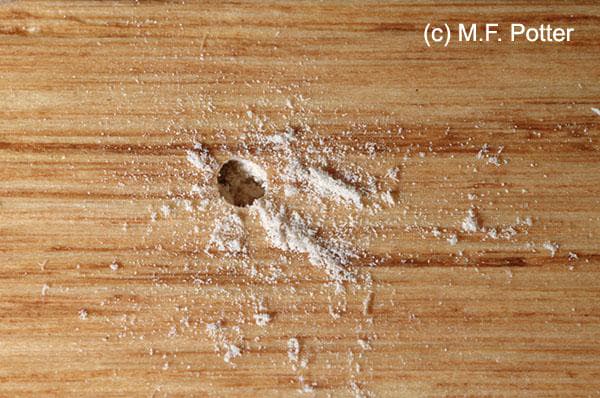 Photo is courtesy of Entomology at the University of Kentucky, and shows the powdery residue made by the beetles.
Powderpost beetles also like to chew up wooden structures, but they have a strong preference for hardwoods like oak, walnut, hickory, etc. Normally, you don’t see the insects, only the powdery residue that they leave around their exit holes. This has a consistency more like flour than sawdust.
Acculevel does not provide any services related to extermination, so we cannot recommend the best course of treatment, or estimate the costs of that treatment. But the EPA oversees and regulates the chemicals used in this occupation, and says any company that offers extermination services must be licensed by your state. You can ask to see the company’s license and, if you have any concerns, call your state pesticide regulatory agency.
The EPA has a Citizen’s Guide to Pest Control & Safety that gives additional advice on selecting the right contractor for you. If you are interested in services for other pests, or for more “green” methods of treatment, check out Angie’s List of Home Pest Control and Exterminators.
Mold is another possible side effect of a damp basement. Like insects, some varieties of mold are useful to humans; if you are a cheese-lover, you owe mold some appreciation. These types of mold are safe for most people to eat, and give certain cheeses like Gorgonzola, Stilton, Brie, and Camembert their distinctive flavors.
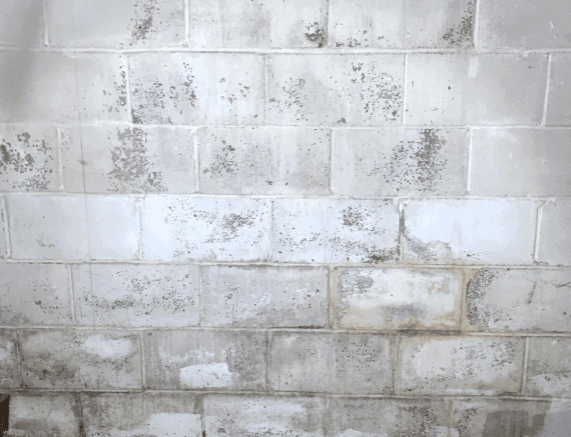 This picture was taken by an Acculevel project advisor on a routine free estimate appointment. Speckles of black mold are abundant on the blocks.
But the majority of molds are not helpful (and I’m not just talking to the lactose-intolerant here). Your basement isn’t going to grow any of those food-safe types.
We are often asked, “how can mold grow on concrete?”
Mold is a living thing and it has basic needs for food and water. Concrete itself does not provide either of these. But your home naturally creates dust, which is a food source for mold. And if water is seeping into the concrete foundation, that provides enough water to sustain mold.
Please do not underestimate the health risks caused by mold; even hardy people with strong immune systems can suffer side effects from mold growth.
The most common symptoms are:
These first 3 are pretty common, and often associated with allergies in general. This can make it difficult for you to determine what the cause is, or where the source is. But if you have a damp basement that is developing a musty or pungent smell? You should go hunting for mold- assuming it’s safe for you to do so. This isn’t the case for everyone. If you have allergies, asthma, or other respiratory problems, you should leave this process to professionals.
Mold spores, the particles that transfer mold from one location to another, are very harmful to people with existing respiratory issues. For some people, just walking through a moldy area can trigger an asthma attack or a migraine to flare.
It’s also important to know that long term exposure to mold has been linked to adults developing asthma. Children are even more susceptible to this risk. If you have more questions about these health risks, or would like more detailed information, we have an article that fully explores this topic.
These first two issues, insects and mold, develop as a side effect of having water in the basement. The last one is caused by the water itself.
As we mentioned earlier in our warning against waterproofing paint, having water in your foundation is a serious threat to your home’s structure.
Your home’s health- its stability- is at risk when you have water gathering in and around the foundation. During heavy rains, or in areas with a high water table, hydrostatic pressure forms.
Hydrostatic Pressure, explained: water collects in the ground when it rains. Water saturating the ground adds weight, which then creates pressure; eventually, it wants to expand into the space your home is occupying. Your foundation is in its way, functioning like a dam. Hydrostatic pressure is the force caused by this water pushing against your foundation. You can find a deeper dive into this topic on our blog.
In summary, hydrostatic pressure is water being pressed against your foundation. Water creates decay, which weakens the walls enough that they can develop cracks. Those cracks allow more water to seep in, increasing the pressure on the already weakened wall section. The cycle keeps repeating, until the wall is bowing, bulging and even eventually collapsing.
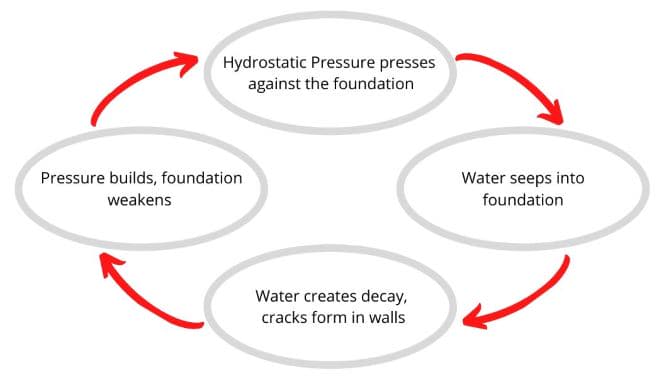
If you have a bowed wall in your basement, you need to get it fixed immediately. We explain why this is so critical in this article. I know this is a waterproofing guide, and that is where our focus should be. But if you have a bowing wall, that takes precedence over everything else. A bowing wall can collapse, which will be very disruptive, destructive, and costly. That wall is threatening the integrity and structural stability of your home; fix it first, then come back to waterproofing. Please.
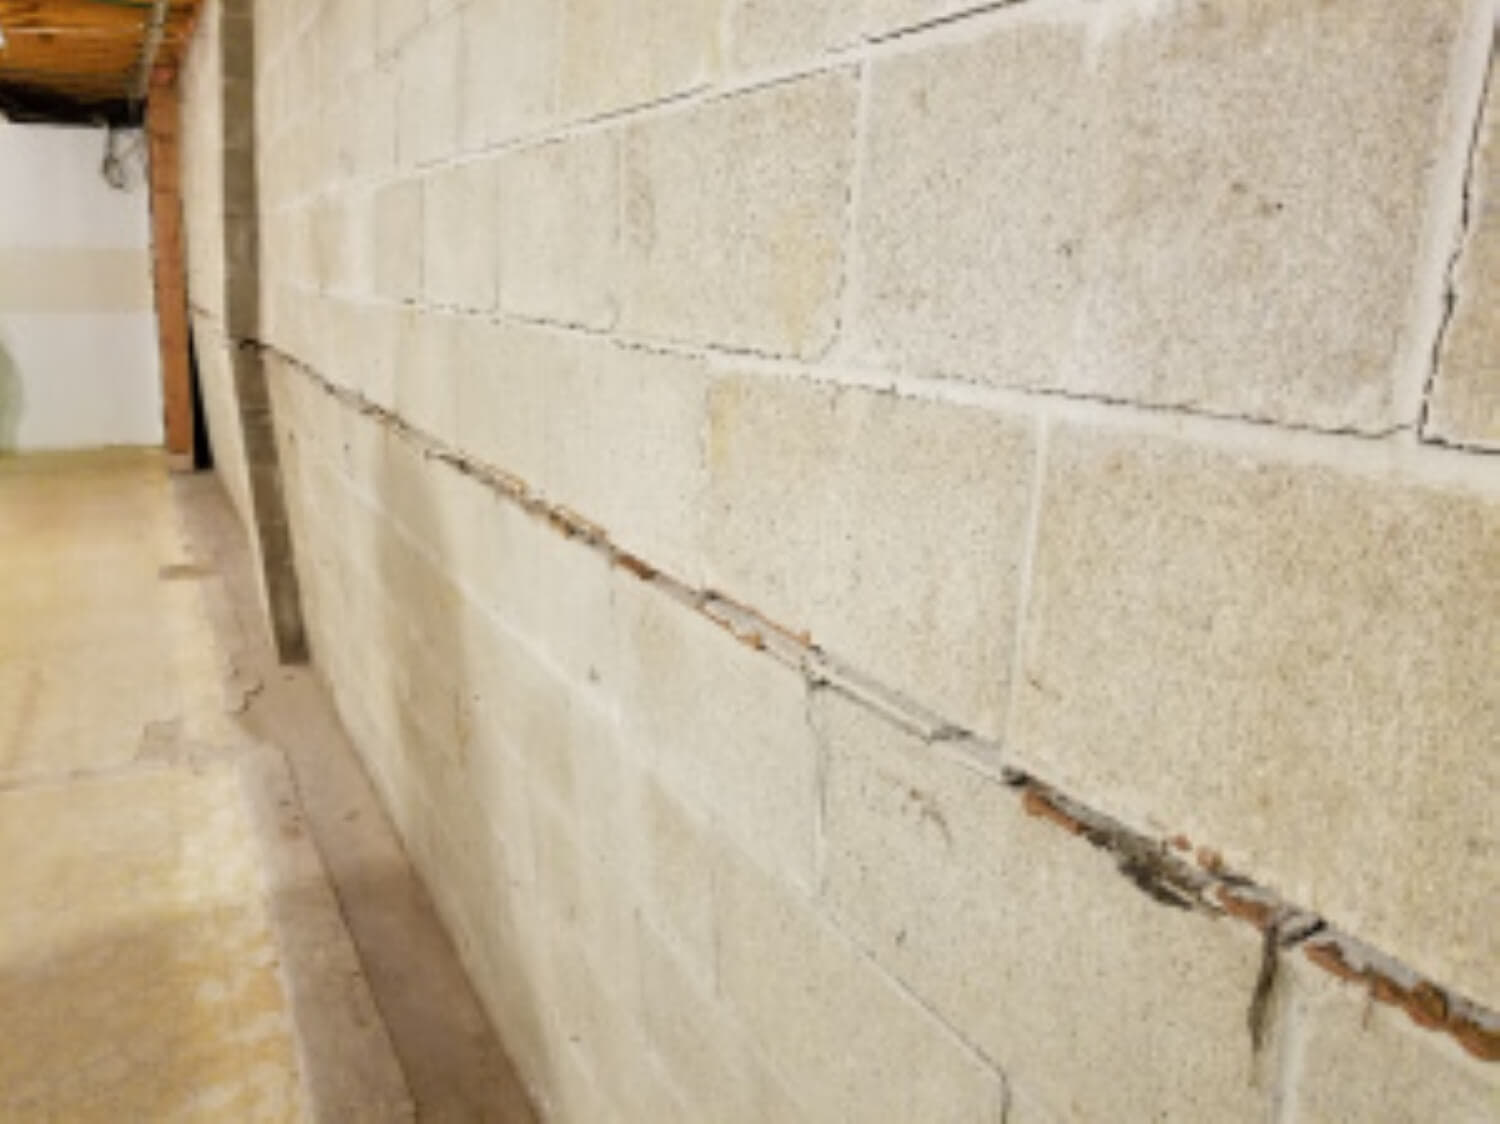 This picture was taken by an Acculevel project advisor on a routine free estimate appointment. The long horizontal crack is a telltale sign of bowing. In this case, the wall is clearly curving inward at the center.
Now, assuming you don’t have a bowing wall to repair, let’s talk about something more pleasant. Waterproofing a basement isn’t only preventing the negative; there are also positive perks to having a drier basement!
Once you have the water controlled in your basement, you have immediate peace of mind. You’ve taken a significant step to add a much needed layer of protection to your home’s foundation, and this adds intrinsic value to your property.
You also have more livable space at your disposal. This can allow you to relocate your laundry room, create a home gym, or - if you’re Jethro Gibbs- build a boat.
The options are pretty much endless at this point. Want to garden in your basement? The lack of windows is no longer a problem. You can find a wide range of grow lights at any hardware or DIY store. I know someone who maintains a ‘salad garden’ year-round, filled with a variety of lettuces, herbs and cherry tomatoes.
Of course, you can also do a more traditional remodel, and finish off part (or all) of the space. Build a home theater, add a guest suite, or even an apartment you can rent out for extra income. Whenever you add living space to your home, you improve your quality of life and increase your home’s resale value. According to Remodeling magazine, a basement remodel can provide a 70% return on your investment.
Now that I’ve fired your imagination with the potential hidden in your basement, let’s discuss the components you need to make those ideas possible.
When basement waterproofing in Michigan, there are two essential components: the water drainage track and a sump pump. Water drainage systems are typically installed along the walls, into the floor of your basement. The water is then channeled to a sump pump, which expels the water.
There are different types of drainage that can be used in a basement, depending on the needs and construction of your home. The most important factor in this decision is if your home has a footer installed or not. Homes built after 1950 generally have footers, which allows for the less expensive water tunnel drainage option.
You can generally make an educated guess about your home’s footer (or lack of one). But even a contractor can be wrong sometimes. Acculevel encounters issues with footers in 10-15% of our customers’ homes.
In some instances, the issue can’t be detected until after installation begins. Sometimes when the floor is opened up, the contractor finds a damaged or decayed footer which won’t adequately serve as a base for water drainage.
If the footer is damaged, or your home was built before footers were commonly installed, you’ll need a different type of drainage like fast track, instead. We review these options in greater detail later on.
A few moments ago, I said drainage systems are typically installed along the walls. And that’s true! But if there’s a large crack in your floor that is leaking water? You’ll also need to install drainage where that crack has formed, and connect it to the perimeter drainage.
If a crack is very thin and isn’t letting in any water, you may be able to repair it with a high-quality epoxy. The epoxy is slightly flexible, which allows it to expand and contract with the floor. But once a crack has started letting in water, sealing it is no longer a good option. Water under the floor will build up pressure; even if the epoxy holds firm, the pressure will create new cracks around the first.
There are more options for cracks in a basement wall. For these, the repair method is largely determined by the wall’s material.
If your foundation wall is poured concrete, then the crack should be repaired. If the crack is not caused by hydrostatic pressure or settling, a two-part seal is used. On the inside, a flexible epoxy should be applied. Once that’s done, the contractor will go outside your home to the same spot on the foundation. They then dig out the ground around the wall crack, and seal it from the outside with a mix of mortar and black foundation mastic, with a strong layer of plastic on top.
If your foundation wall is made of concrete blocks, this double-sealing method doesn’t work. If the cracking is minimal, sometimes tuck pointing (a masonry repair to the block) is enough. But most of the time, cracks form in blocks because of water saturation, settling or hydrostatic pressure.
If there are several cracks, or the cracks are leaking water, encapsulation may be the best solution for a leaking concrete block wall. The encapsulation plastic is attached to the inside of the basement wall, where it forces the water to drain down into the water tunnel. We’ll go into more detail about encapsulation later.
Concrete block foundations often need weep holes to address water saturation.
We’ve established that concrete is porous, and allows water to penetrate its surface. Concrete blocks have hollow cores, and those cores give water a place to settle and pool. To resolve this, we need to give that water a place to go that we can control.
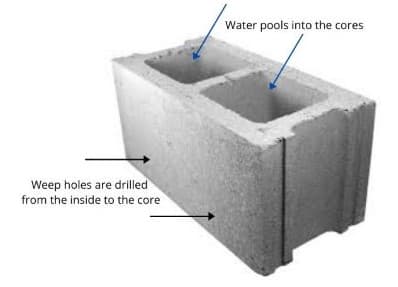
This is why you need weep holes. These small holes are drilled through the inside “wall” portion of the blocks. By that, I mean they don’t go all the way through the block to the outside of the wall. They’d let in dirt and debris if they were.
These weep holes aren’t drilled into every concrete block on your wall. They’re only bored into the bottom row of blocks, along the basement wall. Gravity will ensure that the water will flow down; a weep hole at the bottom gives water a way to flow out of the wall and out of the basement.
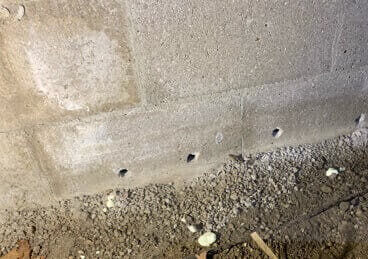 This picture was taken by an Acculevel crew member during installation. Weep holes are clearly shown in the bottom blocks.
Why are weep holes only used in block walls? Poured Concrete walls do not have hollow cores. Any water that is coming through a poured concrete wall has permeated all the way through “solid” concrete. (Solid concrete is still porous.) This water forcing its way through - and the hydrostatic pressure that generates it- is what cracks a wall.
A sump pump is the part of the water drainage system that removes the water from your basement or crawl space. There are a variety of brands and sizes, with optional features.
Sump pumps need an electrical outlet to be used. If your basement does not have electricity wired into it, we recommend that you wait to schedule an electrician until after the water drainage is installed. This ensures that the sump pump location is clear and obvious, so the electrical outlet can be conveniently located.
If the water drainage system will be managing a high volume of water, you may need two standard size sump pumps, or a heavy duty model. The heavy duty pumps Acculevel installs also include a battery backup.
At Acculevel, we always include a battery backup when we install a sump pump as a best practice. The most common cause for a power outage is bad weather; in the midwest, bad weather usually includes rain or snow. If your power goes out and the basement floods, you are most likely going to be responsible for the costs of the repairs.
FYI: Sump pump failure is not covered by flood insurance- only by an additional endorsement for sewer & drain. We cover this topic in more detail in our article about insurance coverage.
Another option to consider is internet monitoring for your sump pump. For an additional cost, you can add a text alert system that will work with your phone or tablet. The app will update you whenever there is a problem, maintenance issue, or action is needed.
Customers sometimes ask if they can route the drainage system out of the house into a drain, or over a hilly area of their yard. We strongly discourage this. Not because we want to sell you a sump pump, but because it invites other issues.
An open drain is vulnerable to: tree and plant roots, soil, leaf litter, plant debris, animal nests… essentially, it’s open to interference from anything that might be in your yard. This is a perfect example of why you should do something right the first time. Installing a sump pump and buried drainage line once is less painful than repairing or replacing an open drainage line repeatedly.
Unlike a sump pump, a dehumidifier is not mandatory for water drainage. But in many cases, it’s a necessary and desirable addition. This is especially true if you live in our service area: the Midwest is known for wide ranges in both temperature and humidity levels.
High humidity is a threat to the wooden flooring structure of your home. Dampness will gradually weaken the joists and beams, allowing them to rot/decay until they begin to shrink or compress. If you have sinking or sloping floors, this is often the cause.
A damp environment also increases the wear and tear on your furniture, electronics, and on you and your family. High humidity generates enough moisture to feed mold spores, a leading source of allergens. It also creates the musty odors associated with basements.
Your AC unit will run more smoothly and efficiently, when combined with a dehumidifier. Air conditioners do a certain amount of dehumidifying as they cool the air, but it’s not what they’re designed to do.
Additionally, drier air feels cooler than moist air. You may be able to set your house at a higher temperature in the summer if you have a dehumidifier. A higher thermostat setting + a more efficient air conditioner = lower utility bills. This is an equation that makes every homeowner happy!
At the beginning of this section, I told you a dehumidifier isn’t mandatory for waterproofing. And that is true. But if you want to fully finish your basement and make it truly and completely water-free, you will need to encapsulate it and install a high- quality whole-house dehumidifier.
The next three chapters answer frequently asked questions related to waterproofing. We cover topics like french drains, downspout extensions, and encapsulation. If you would like to skip ahead to the section on water drainage types and costs, you can do that by clicking here and going directly to Chapter 10.
We’ve referenced encapsulation several times, so let me provide some details here. When people hear the word ‘encapsulation,’ most people assume it’s for a crawl space. But encapsulation has a practical application for basements, as well.
FYI: Encapsulation is the process of covering the basement walls with a thick plastic sheeting. It’s similar to installing a pool liner, except the function in this instance is to keep water from coming in.
After a water drainage system is installed, your basement can be encapsulated. This will ensure any water seeping through the walls is directed only down to the drain- not out into your basement. It will also seal out moisture that collects as humidity levels increase. Like we discussed with dehumidifiers, a certain amount of condensation is to be expected because of temperature differences between the outside of your foundation and inside your basement.
That is an excellent question, dear reader, and I’m glad you asked. When you apply waterproofing paint, the pain adheres tightly to the wall’s surface, filling the outermost pores of the concrete. This prevents water from coming through and traps it inside the wall.
Encapsulation is not glued in place like wallpaper. It’s installed to allow for a tiny gap between the white cap and wall. This lets the water through the concrete, but not out into the basement directly, The moisture only reaches the inside of the white cap and then slides down into the drainage.
Generally, this is of significant importance in older homes with foundations made of brick or stone. These materials are highly permeable, and offer less resistance to water seepage (when compared to modern concrete or concrete block). Water can have a damaging effect on the mortar joints between bricks and stones, which increases the likelihood of water seepage.
We also recommend encapsulation on the walls if you plan to fully finish the basement. Even when the water is draining into a drainage system, the foundation itself can become damp. That humidity can be enough to allow mold to develop in the insulation and spread to the drywall and wooden framing. No one wants to install a shiny new home theater in their basement, develop mold, and tear a portion of it apart to clean up and start over.
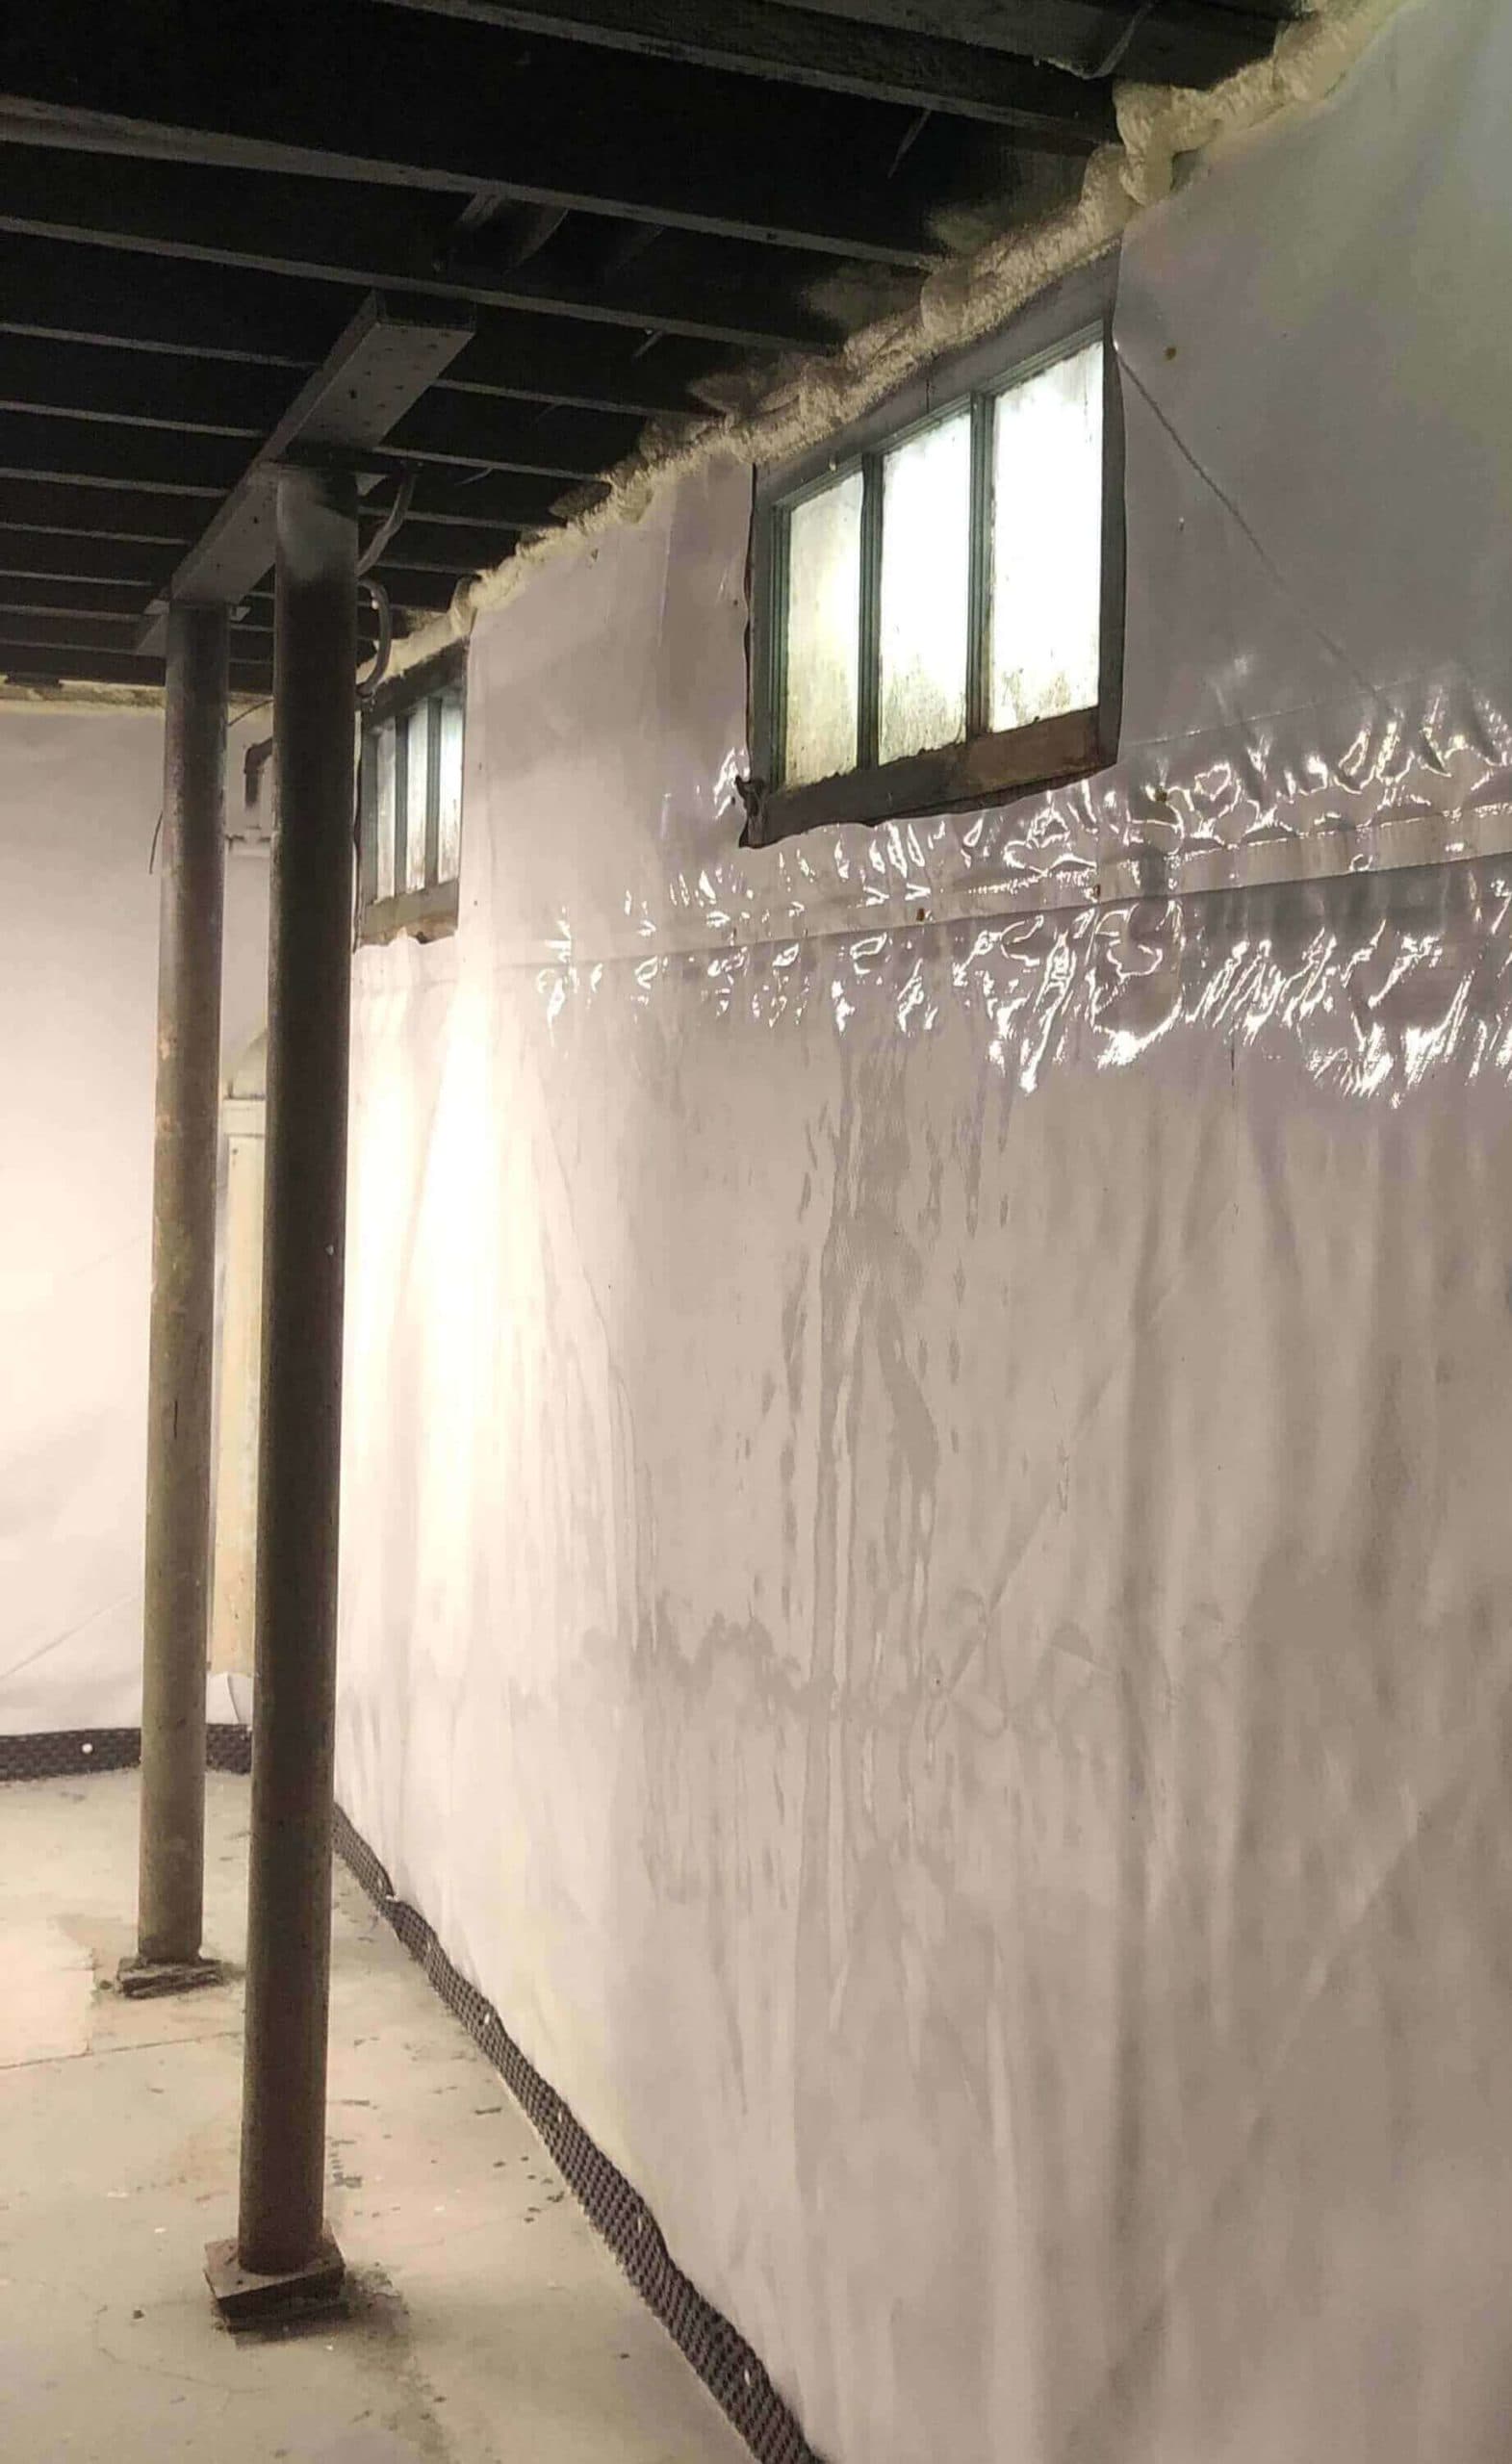 This picture was taken by an Acculevel crew member during encapsulation. White cap is being applied to the basement wall, and sealed against the ceiling with spray foam insulation.
Many times, finding the source of the water will help you find a solution. For some of you, it’s super obvious. There’s a crack in your foundation, water is coming in there. And you’re right- the obvious solution is to repair the crack.
But you still need to look at why the water is coming in at that specific location. What made that crack form in that precise spot? Hydrostatic pressure is one possibility, and it’s a likely culprit if you live in an area with a high water table. I mentioned the effect of hydrostatic pressure earlier; if you’d like a deep dive into the topic, we have a detailed analysis of it in this article.
FYI: Water Table: refers to the level of the ground at which the soil is saturated with water. This usually fluctuates with the seasons; summer drought lowers the level, spring rains raise it.
But it’s a worthwhile endeavor to check the exterior surroundings of your home. Do you have a puddle forming in that spot, on the outside of the foundation crack? What caused that puddle? Is something in the landscape to blame?
Let me give you a quick flashback to our review of typical building practice: when a home is built, the hole dug was significantly larger than the basement. This gap allowed access for construction crews to build and install the foundation, utilities, etc. Once that work was completed, they backfilled around your home with soil, then installed your landscaping on top.
Backfill is a term used for the dirt removed from the ground during construction. Some of it is hauled away, but most of it is used for grading your yard and filling in the gaps around the foundation. This backfill will settle over time, because it’s not compacted tightly around the house. That would put excess pressure on the exterior drainage system.
Sometimes, it settles down in a way that allows rainwater to run towards your foundation. Another item to watch is the components of your landscaping. Some of the most commonly-used components (edging, curbs, borders made of timber or stones) can inadvertently trap water along the foundation and cause it to pool around your house. If this is your primary issue, these are usually an “easy fix.” (We often recommend a landscaping contractor for this type of concern.)
If you don’t see any issues with the slope or landscaping, but there’s water pooling around the foundation of your home, it’s time to look at another potential threat.
If your gutters release water within a few feet of your home, you need downspout extensions. During a thunderstorm, your gutter works like a funnel, collecting water from the wide surface of your roof and channeling it into narrow downspouts.
The water builds up momentum as it runs down the guttering, exiting the downspout with a fair amount of force. If your downspout extensions don’t carry it a safe distance from your house, they’re depositing a large concentration of water directly around your foundation.
This is NOT something you want.
Water too close to your home has a nasty way of finding its way back to your house; it works something like this:
FYI: Slabjacking is a highly effective method of concrete lifting that can restore lost grading, at a fraction of the price of slab replacement.
Extensions should be attached to your existing downspouts and then routed well away from your house. We recommend that downspouts be a minimum of 10 feet from your foundation. If at all possible, incorporate your yard’s natural grading to improve the drainage flow. Once the extensions are in place, they can be buried in the yard. They don’t need to be deeply buried in the yard- 5-6 inches below the surface is sufficient. This is something it’s possible to DIY, if you’re so inclined.
The cost to extend a downspout is $330 per 10 foot extension, if the total home repair cost is at least $1,000. Depending on your property and its grading, you may want more than 10 feet (20 feet is optimal, if your property allows for it). Extensions past the initial 10 foot mark are an additional $25 per foot.
Interior water drainage can sometimes be referred to as a ‘french drain.’ Both systems serve the same purpose: to remove water from one place to drain it somewhere else. At one time, these two terms were interchangeably used. This is no longer the case, so we avoid using the term “french drain” to describe our water drainage system.
If you go to a home improvement store or check out any DIY websites, you’ll notice they refer to a french drain as an exterior drainage system. Acculevel does not install exterior french drains in yards or landscaping. For those systems, we recommend that you contact a landscaper or general contractor to complete this type of project.
Exterior water drainage systems are installed when a home is built. They function in the same way as an interior system; water works its way through the soil, then drains into a channel that drains away from the house.
The advantages of this exterior drainage are:
However, an exterior system only functions well for 15-25 years. They have a limited life span, because they are outdoors and subject to the whims of Mother Nature. Over time, sediment gradually works its way into the exterior drainage system. This creates clogs and then blockages. Once the drainage lines are blocked, they cannot be easily cleared- there’s 8+ feet of earth between you and the line. The only way to typically fix this is to excavate the system and replace it.
This is a messy, time consuming process. The contractor must dig 8-10 feet down in a trench all the way around the house, to fully expose the system. In the process, everything in this area of your landscaping will be disrupted; your deck or porch will need to be removed, patios and walkways broken up, and landscaping will be uprooted and need to be relocated. Depending on the layout of your property, your garage may be affected also. This is especially true if it’s an attached garage.
Once the new exterior drainage is installed, and all of the landscape items have been re-installed or replaced, your house is good to go- for another 15-25 years. Costs for this process, on average, range from $25,000-$35,000 and take weeks to complete.
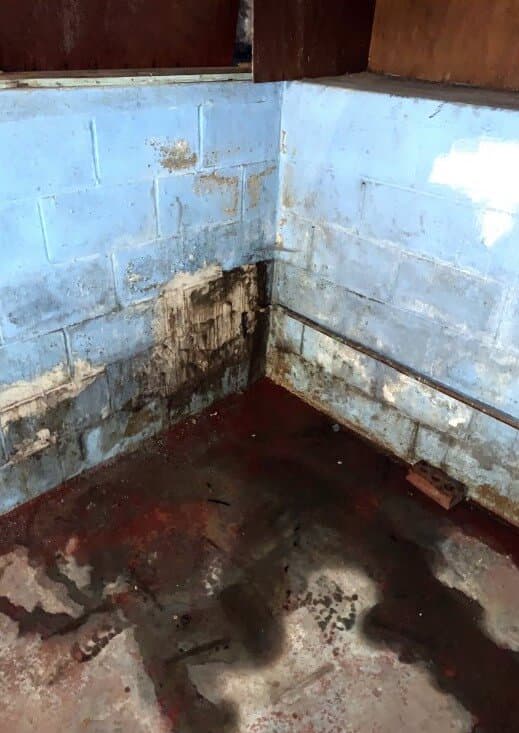 This picture was taken by an Acculevel project advisor on a routine free estimate appointment. Standing water and mold are both evident in the basement corner.
There are some drawbacks to interior drainage, as I noted above. It’s inside your home where you have to see it, and it requires a sump pump that occasionally needs maintenance. These are annoyances. The advantages of an interior system are significant:
This varies, depending on the size of your basement and the type of drainage needed. In general, over the last 12 months, our customers have paid an average between $5700-$7100.
Any contractor you work with should be able to give you a reliable estimate of cost. But if you would like to get a ballpark number for yourself, you’ll need to know the linear footage of your basement.
Please don’t confuse this with square footage- that’s a different measurement, used to determine how much paint or flooring you need. Linear footage is the distance around the perimeter of your basement. To calculate linear footage, measure the length of each wall, then add them together.
Once you know the linear footage, you next have to determine which type of drainage track.
If you would like to further explore this topic, we have a detailed breakdown in this article.
When you look around your basement, you may find some issues that are going to add to the waterproofing cost.
If there is mold growing in your basement, you should have that cleaned and treated. We reviewed this topic earlier. We also thoroughly cover the dangers of mold in this blog article.
Under most circumstances, we use a two part process. The first step is to apply a treatment that kills the mold growth. Once that is done, we apply a sealant over the affected area to prevent new development. In extreme cases, the area may need to be scraped before the kill treatment can be applied.
The costs for treatment can vary a great deal, depending on how much surface area is affected, as well as how severely. Treatment costs are priced per square foot; for example, sealant options vary from $2-$4 per foot.
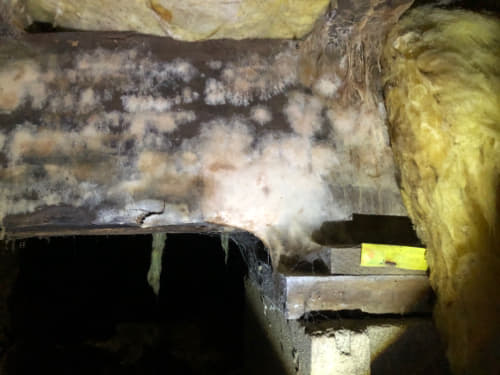 This picture was taken by an Acculevel project advisor; this is an example of mold that would need to be “scraped” first.
Acculevel is an Anabec-trained contractor. Their products are cleaning chemicals that are tailored to fit many applications. Their philosophy is that “less is best” when it comes to the application of chemicals to surfaces. Anabec designs their chemicals to complete the job with the smallest impact on your home and its surroundings.
In the last twelve months, our customers have paid between $2350-$4700 for mold treatment. For a thorough review of the treatment options and pricing, please check out our guide to the best methods and prices.
Once you have a water drainage system installed, encapsulation can be done. There are two parts to encapsulation. The white cap that Acculevel uses is a polyurethane membrane interlaced with high-density fibers. This encapsulation material is the strongest and most puncture-resistant on the market. And since it’s inorganic, it will not support mold.
White cap is installed throughout the space, covering all of the walls. The seams are sealed, and the white cap is secured at the top of the walls.
For the average basement, the cost ranges from $3875-$5200.
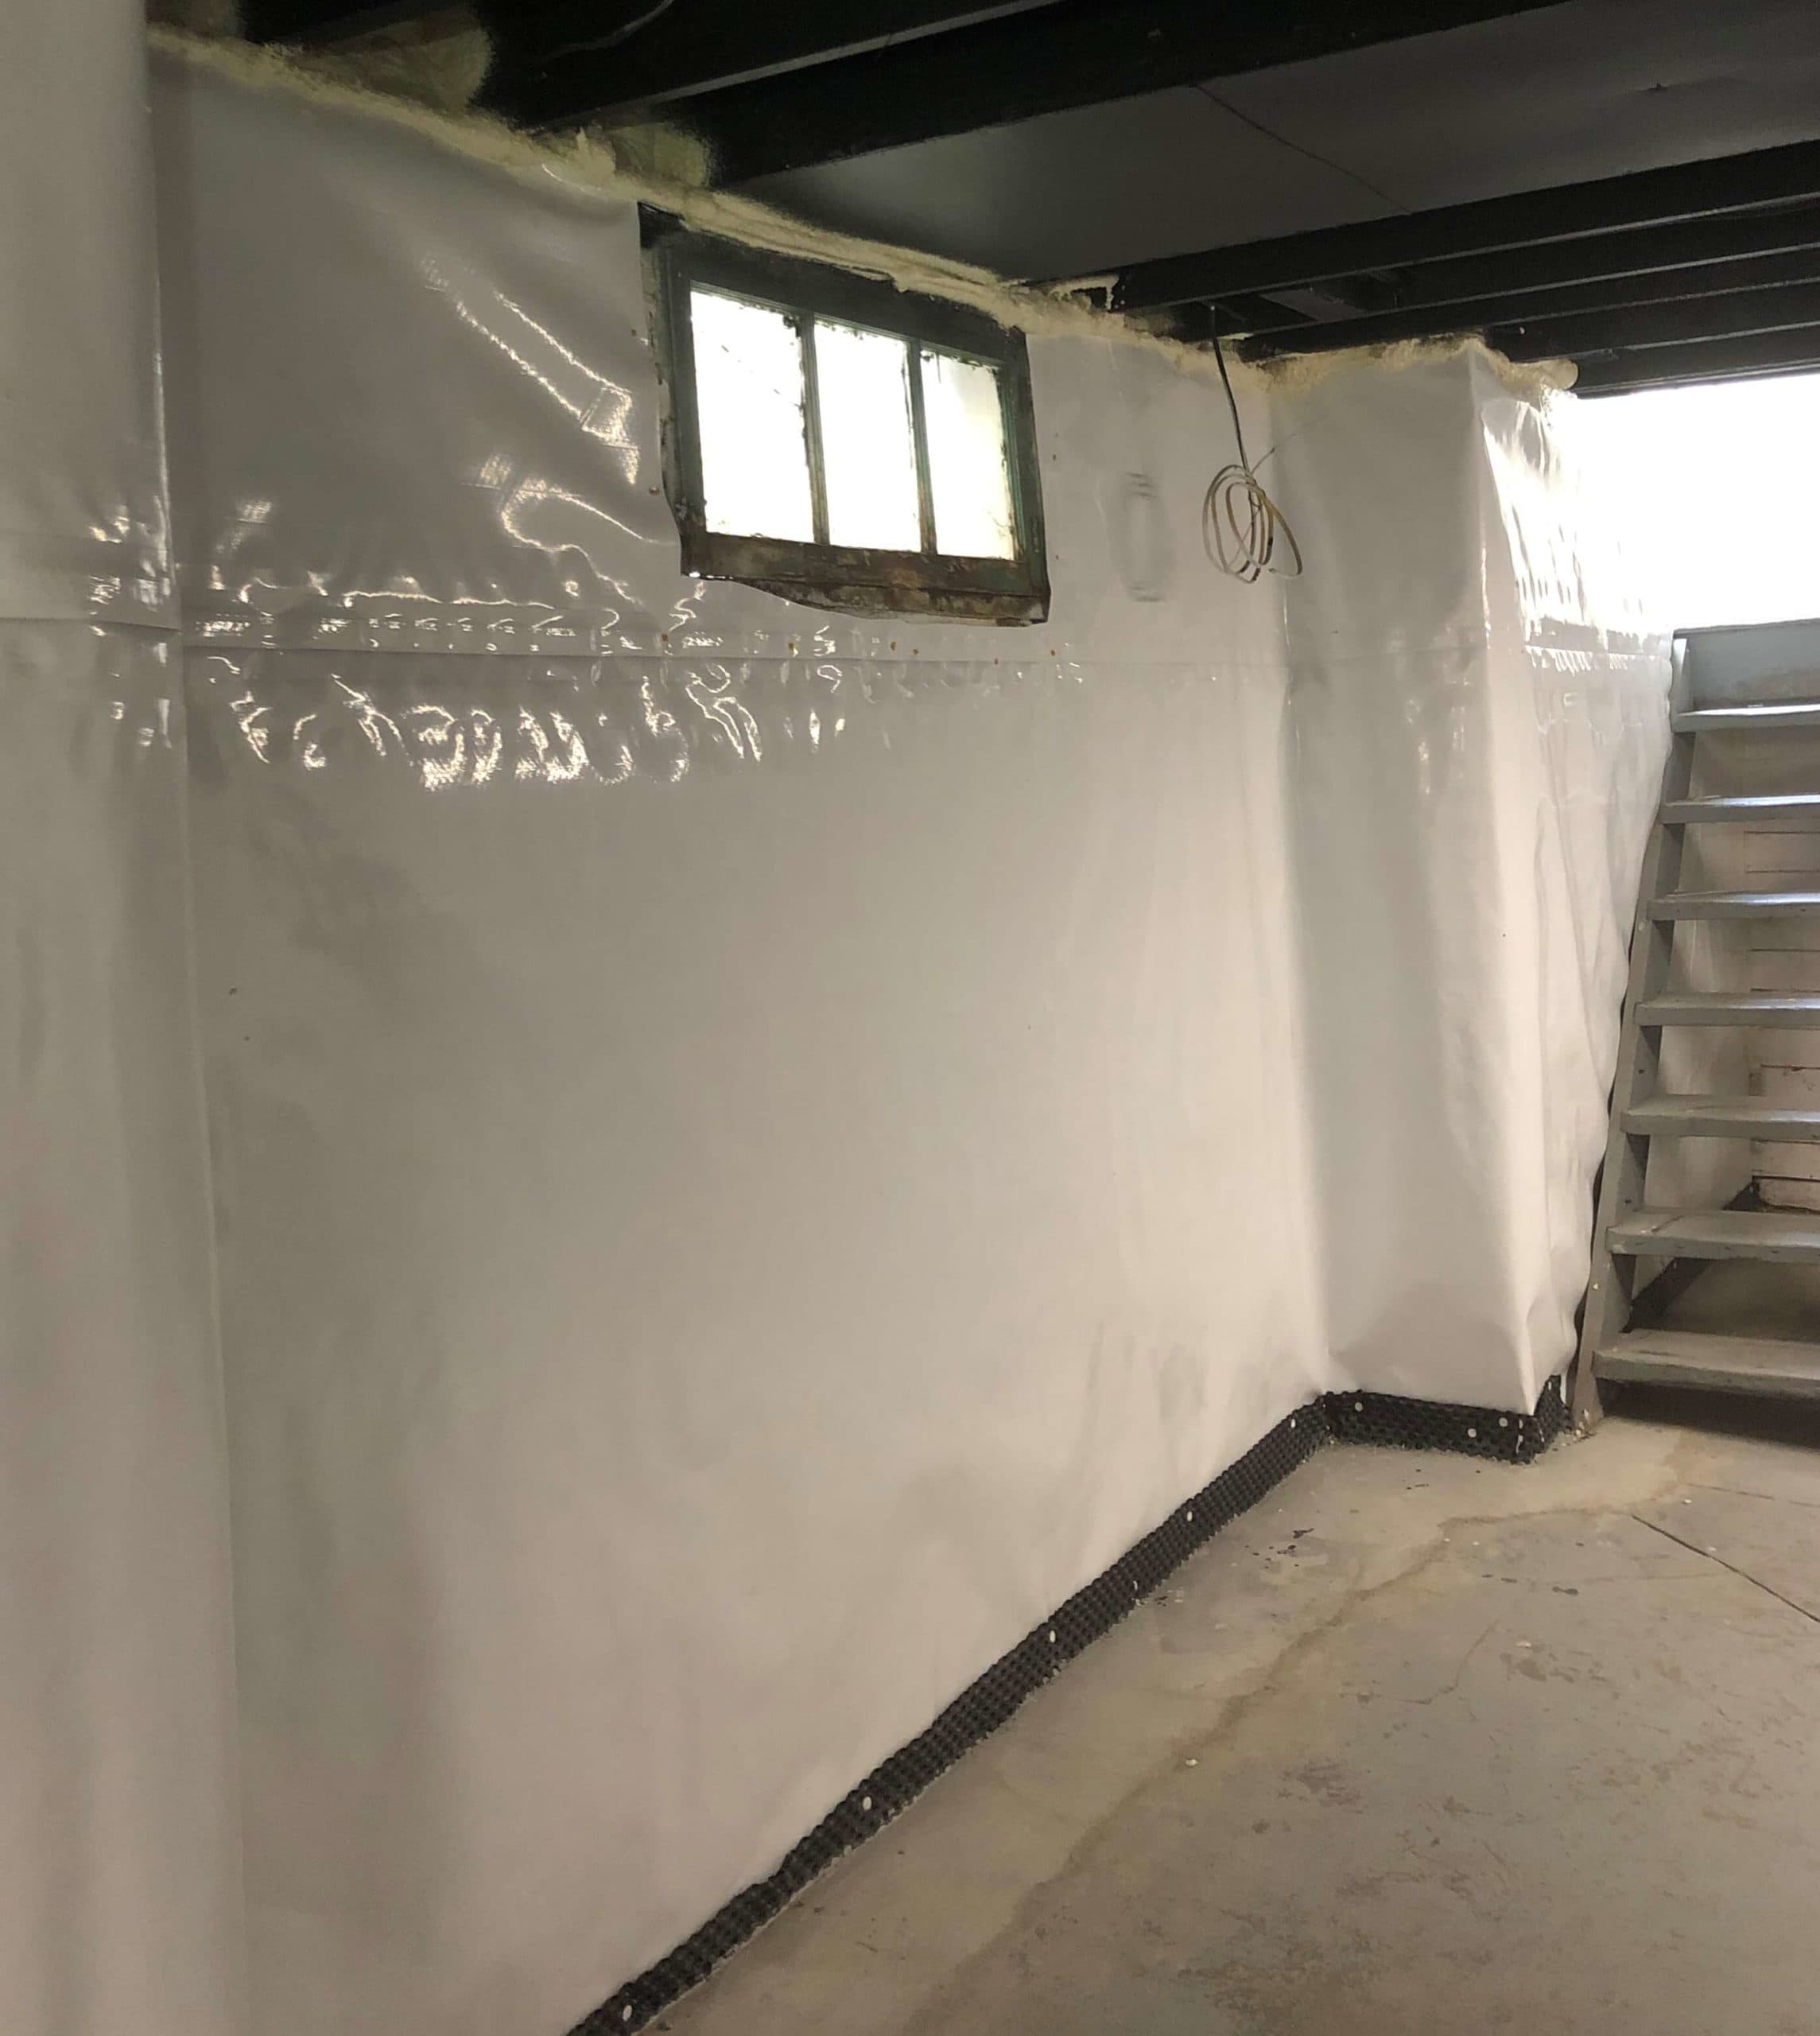 This picture was taken by an Acculevel crew member during installation. White cap is installed along the wall, sealed at the top with spray foam insulation.
The second component of encapsulation is a whole house dehumidifier. This is necessary because managing the water outside the encapsulation does not guarantee a 100% dry space inside the encapsulation.
I’m writing this from the Midwest, and I assure you that here we have frequent temperature and humidity changes. These fluctuations cause significant amounts of condensation to gather on your HVAC system, duct pipes, water and drain pipes- even on the floor itself. In the Midwest, a dehumidifier is strongly recommended with or without encapsulation.
Once your basement is sealed with white cap, the moisture that develops inside is trapped. This is going to recreate many of the problems you intended to stop by waterproofing your basement! But a quality dehumidifier will remove this moisture and clean the air circulated throughout your home. The cost to install a dehumidifier is $2175-2650, covers up to 5,000 square feet, and has a 5-year manufacturer’s warranty.
I hope we’ve addressed your questions, and provided you with the detailed background you needed. If you have additional questions or concerns specific to your home, your best resource is an experienced contractor who will evaluate your basement and resolve your waterproofing issues.
Before signing any contract, we urge you to always verify the company is reputable, insured, and accredited by the Better Business Bureau. We have an article that outlines questions that you should ask a contractor before signing an agreement.
If you live in our service area, please call us. Acculevel is a family-owned company that uses American-made products whenever possible. We offer free estimates to all our customers, and we do not use high pressure or “hard sell” techniques. All of the services we provide are performed by our own employees; we do not use subcontractors on any of our job sites. We look forward to serving you!
Originally posted 8/4/21; updated 12/14/22
Table of Contents