Originally posted 9/28/2018, updated 12/17/2020
Your home’s guttering helps to protect your foundation. It collects rainwater as it cascades across your roof and funnels it down the drainpipe. That’s all well and good, but where does this drainpipe end? Does it extend a fair distance into the yard, where it discharges the water safely away from your home, garage, driveway- any structure that erosion can damage? Once the water discharges, is the ground graded (sloped) in a way that allows the water to continue flowing away from structures naturally?
I ask this because when water collects around concrete, it applies pressure to that concrete and can also cause erosion below it. This water intrusion and pressure is what leads to a settling foundation, cracked and sinking slabs, and leaks into your basement or crawl space.
Since Andy Beery began Acculevel in 1996, we’ve repaired tens of thousands of foundations. Our experience has taught us that downspout extensions are one of the most effective ways to prevent hydrostatic pressure from damaging foundations. We recommend that homeowners have their downspouts discharge water -at minimum- 10 feet away from their homes. Unlike foundation repairs that should be left to the experts, extending your downspouts can be an excellent DIY project. In this article, we’re going to break this task into 4 manageable steps, complete with a video demonstration at the end.
A smart way to start every project is to make sure you have the necessary tools and equipment. Take a good look at the area around your home, and identify the logical places the downspouts should end. If you will need to avoid or detour around obstacles, such as a tree or patio, use flexible drainage piping. For each extension, you will also need:
Using the shovel, start digging a trench directly in front of the downspout attached to the house. You’ll want to dig 6-8 inches below the surface. Angle the trench away from the house, with a very slight slope downward from the foundation. Save the dirt; you will need some of it to bury the drainage pipe. The finished trench should be at least 10 feet long.
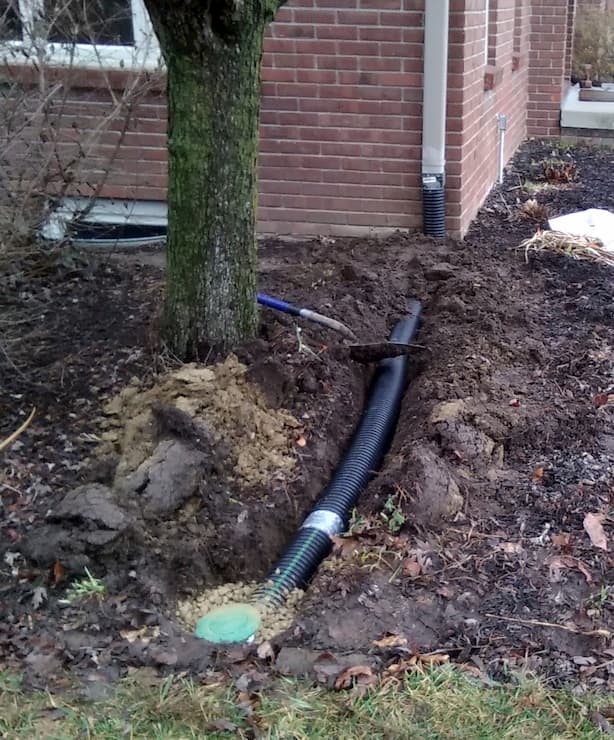
Lay the 4-inch drainage pipe in the trench. Attach one end to the existing gutter downspout, (include the 90 degree elbow if rigid pipe) using the adaptor. Make sure it attaches securely.
 This photo was taken by an Acculevel crew member during installation.
At the other end of the drainage pipe, attach the pop-up to the pipe, using the internal coupling. Make sure the fit is snug. Your pop-up must be face up and as level as possible. Using the gravel, fill in around the pop-up. You want the gravel to hold the pop-up emitter in place. You will probably need to adjust the emitter as you go, keeping it level. Do not pour gravel on top of the pop-up.
Once your extension is installed and well-placed, it’s time to backfill. Using the shovel, take all the dirt you removed from the trench and start refilling. Fill in around and on top of the drainage pipe. If you have additional gravel left, you can use this around the popup- but do not put it on top of the popup. You don’t want to compress or constrict the water flowing through the pipe.
When you reach the house, make sure you follow the grading (slope) of the home. Having too much soil piled up next to the house can also create many of the same negative effects you’re trying to prevent.
One of our efficient and capable crew members demonstrates this process in the video below:
As a DIY fan, we’d like to also offer you our free Home Inspection Checklist. This is modeled after the Annual 21 Point Inspection that we perform for our customers (a 5 year inspection plan is $500). This checklist will walk you through performing a “check-up” of your home’s foundation, detailing what potential signs you should look for, and how to take action if you find potential issues.
We also have another free resource available; it’s our Symptom Checker. This interactive tool allows you to research possible concerns about your home. It will suggest additional articles and videos for those topics, so you can learn more about causes, warning signs, and repair options.
Find a high-quality experienced foundation repair or contractor to help you evaluate the issues and recommend the best solution(s). Before you sign a contract for any service, we urge you to always verify the company is reputable, insured, and accredited by the Better Business Bureau.
If you live in Indiana or the surrounding states, contact Acculevel. If you have noticed any problems and would like an evaluation, you can request a free estimate. An experienced project manager will examine the areas of concern and recommend the best course of action for you, to keep your home strong and healthy for years to come.
[DISPLAY_ULTIMATE_SOCIAL_ICONS]